1ターボとブローオフバルブ
1Turbos and blow-off valves
ターボは加速が変わる部品、ブローオフバルブはアクセルを抜いたときに「プシュッ」と鳴るだけの部品です。どちらもモデルは要りません。
A turbo changes how the car accelerates; a blow-off valve only adds the "pssh" when you lift off. Neither needs a model.
最小のターボを作る
Make a minimal turbo
- ファイル部品のファイルを置く。
data/mypack/car_parts/my_turbo.json:{ "slot": "turbo", "turbo": { "boost": 0.5 } } - lang表示名を lang に書く。
"part.mypack.my_turbo": "マイタービン"
これで、ゲームの G →「パーツ」→「ターボ」のタブに並びます。boost は全開のときにトルクを何割増やすか(0.5 で 1.5 倍)です。
- FileAdd the part file
data/mypack/car_parts/my_turbo.json:{ "slot": "turbo", "turbo": { "boost": 0.5 } } - langAdd the display name to lang.
"part.mypack.my_turbo": "My Turbo"
It now appears under G → "Parts" → the "Turbo" tab. boost is how much extra torque at full boost (0.5 means 1.5×).
最小のブローオフバルブを作る
Make a minimal blow-off valve
- ファイル部品のファイルを置く。
data/mypack/car_parts/my_bov.json:{ "slot": "blowoff" } - lang表示名を lang に書く。
"part.mypack.my_bov": "マイブローオフ"
ターボを付けている車にだけ、「ブローオフ」のタブが出ます。
- FileAdd the part file
data/mypack/car_parts/my_bov.json:{ "slot": "blowoff" } - langAdd the display name to lang.
"part.mypack.my_bov": "My Blow-off"
The "Blow-off" tab only appears on a car with a turbo fitted.
必要なときだけ
Only when you need it
ターボの効き方を変えたい(立ち上がり・ターボラグ)
{
  "slot": "turbo",
  "turbo": {
    "boost": 0.50,
    "spool_from": 0.30,
    "spool_full": 0.65,
    "spool_rate": 2.0
  }
}boost… 全開のときにトルクを何割増やすか(0〜1.5)spool_from/spool_full… 効き始める回転と、いっぱいに効く回転。アイドルを 0、レブリミットを 1 とした割合で書く。大きいタービンほど高い回転へ寄せるspool_rate… 効きが上がる速さ(0.1〜20)。小さいほどターボラグが長い- 書かなかった項目は、純正タービンくらいの値になる
同梱の 2 つ(比べる目安):
boost | spool_from | spool_full | spool_rate | 既定の車の 0-160km/h | |
|---|---|---|---|---|---|
| なし | — | — | — | — | 11.3 秒 |
| 純正タービン | 0.35 | 0.22 | 0.55 | 3.0 | 8.9 秒 |
| ビッグタービン | 0.70 | 0.40 | 0.78 | 1.4 | 8.0 秒 |
Change how the turbo behaves (spool, lag)
{
  "slot": "turbo",
  "turbo": {
    "boost": 0.50,
    "spool_from": 0.30,
    "spool_full": 0.65,
    "spool_rate": 2.0
  }
}boost— extra torque at full boost (0 to 1.5)spool_from/spool_full— where boost starts and where it is full, as a fraction from idle (0) to the rev limit (1). Bigger turbos sit higherspool_rate— how fast boost builds (0.1 to 20). Smaller means more lag- Anything you leave out takes roughly stock-turbo values
The two bundled turbos, for reference:
boost | spool_from | spool_full | spool_rate | Default car 0-160 km/h | |
|---|---|---|---|---|---|
| None | — | — | — | — | 11.3 s |
| Stock turbo | 0.35 | 0.22 | 0.55 | 3.0 | 8.9 s |
| Big turbo | 0.70 | 0.40 | 0.78 | 1.4 | 8.0 s |
決まった車種にだけ付けたい
cars に車種の id を並べます(ディーゼル車専用のタービン、など)。書かなければ、どの車種にも付けられます。
{
  "slot": "turbo",
  "cars": ["mypack:prado"],
  "turbo": { "boost": 0.4 }
}
Only fit certain cars
List car ids in cars (a turbo only for a diesel, say). Leave it out and every car can fit it.
{
  "slot": "turbo",
  "cars": ["mypack:prado"],
  "turbo": { "boost": 0.4 }
}
ブローオフの音を変えたい
音は部品ではなく車の側で変えます。車の vehicles/<車>.json の sounds に "blowoff" を書きます(車の 7 章)。
Change the blow-off sound
The sound belongs to the car, not the part: set "blowoff" in sounds in the car's vehicles/<car>.json (chapter 7 of the Car guide).
うまくいかないとき
- 「ブローオフ」のタブが出ない … ターボが付いていない。先にターボを付ける
- ログに「ターボの部品に turbo が書かれていません」と出る …
"turbo": { ... }を書く(書かないと純正タービンくらいの値になる) - 見た目が変わらない … ターボとブローオフは、いまは見た目を持たない(換装画面の絵とメーターの TURBO ランプだけ)
When it doesn't work
- No "Blow-off" tab — no turbo is fitted. Fit a turbo first
- The log says the turbo part has no turbo — add
"turbo": { ... }(without it you get roughly stock-turbo values) - Nothing changes on the car's body — turbos and blow-off valves have no looks yet (only the parts-screen icon and the TURBO lamp on the gauges)
2外装パーツ
2Body parts
ウイング・バンパー・フェンダーなど、車体に固定される部品です。
Wings, bumpers, fenders — parts fixed to the body.
最小のパーツを作る
Make a minimal part
- Blender車体の .blend の中に、部品を別のオブジェクトとして作る。名前は
part_<場所>-<部品名>(例part_rear_wing-gt_wing)。場所は下の表から選ぶ - Blender付け替え候補の部品を全部表示にして、車体と一緒に 1 つの OBJ に書き出す。
- ファイル部品のファイルを置く。
data/mypack/car_parts/gt_wing.json(ファイル名が部品名):{ "slot": "rear_wing" } - lang表示名を lang に書く。
"part.mypack.gt_wing": "GT ウイング"
これで、ゲームの G →「パーツ」に、その場所のタブと部品が並びます。
- BlenderModel the part as a separate object inside the car's .blend. Name it
part_<slot>-<part>(e.g.part_rear_wing-gt_wing); pick the slot from the table below - BlenderUnhide every selectable part and export them together with the body, as one OBJ.
- FileAdd the part file
data/mypack/car_parts/gt_wing.json(the file name is the part name):{ "slot": "rear_wing" } - langAdd the display name to lang.
"part.mypack.gt_wing": "GT Wing"
The slot's tab and the part now appear under G → "Parts" in game.
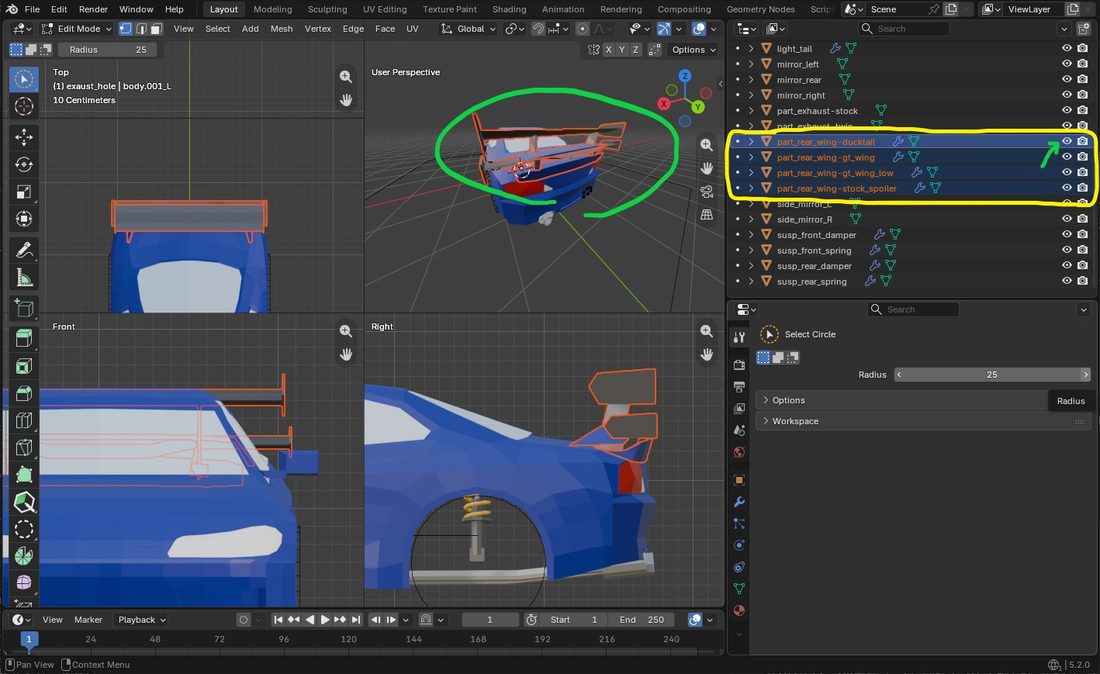
part_rear_wing-…)が車体と同じモデルの中に重なって入っています。アウトライナーで全部を表示(目のアイコンが開いた状態)にしたまま書き出します。ゲームでは付けている 1 つだけが描かれますpart_rear_wing-…) overlap inside the same model as the body. Export with all of them visible in the outliner (eye icon open); in game only the fitted one is drawn.付ける場所(slot)
Slots (slot)
slot | 入るもの |
|---|---|
front_bumper | フロントバンパー、リップ、スプリッター、カナード |
side_skirt | サイドスカート |
fender | オーバーフェンダー |
rear_wing | スポイラー、ウイング、ダックテール |
rear_diffuser | リアバンパー、ディフューザー |
exhaust | マフラー(3 章) |
slot | What goes there |
|---|---|
front_bumper | Front bumper, lip, splitter, canards |
side_skirt | Side skirts |
fender | Over-fenders |
rear_wing | Spoiler, wing, duck tail |
rear_diffuser | Rear bumper, diffuser |
exhaust | Exhaust (chapter 3) |
その車にオブジェクトのある部品も初期装備も無い場所は、タブが出ません。
A slot's tab only appears if the car has an object for one of its parts, or a default part.
必要なときだけ
Only when you need it
走りを変えたい(ダウンフォース aero)
効きを調整しない部品(ダックテールなど)は、数字 1 つで書きます。data/mypack/car_parts/ducktail.json:
{
  "slot": "rear_wing",
  "aero": { "rear": 0.25 }
}
換装画面の「角度」で効きを調整できる部品(GT ウイングなど)は、[最小, 最大] で書きます。前にも効かせたいときは front も書きます。data/mypack/car_parts/gt_wing.json:
{
  "slot": "rear_wing",
  "aero": {
    "rear": [0.6, 1.6],
    "front": 0.1,
    "angle": 0.4
  }
}front/rear… 前と後ろを、どれだけ押し付けるか。大きいほど強い(0〜3)。1 で 200km/h のとき約 190kg- 目安: ウイング付きの市販車で前後合わせて 0.3〜0.6、GT 系のレーシングカーで 2〜3
angle… 「角度」のスライダーの最初の位置(0〜1、省略で 0.5)。角度で変わるのは走りだけで、見た目は動かない- 強くするほど高速コーナーは速くなるが、最高速は落ちる。空気抵抗は自動で決まるので、書く項目はない
- 前を強くすると曲がりやすく(オーバー)、後ろを強くすると安定する(アンダー)
換装画面の右には、その部品のダウンフォースと、付けたときの配分・グリップ・最高速の目安が出ます。
Change how it drives (downforce, aero)
A part whose effect is fixed (a duck tail, say) takes a single number. data/mypack/car_parts/ducktail.json:
{
  "slot": "rear_wing",
  "aero": { "rear": 0.25 }
}
A part whose effect players can adjust with the parts screen's "Angle" slider (a GT wing, say) takes [min, max]. Add front if it should press the front too. data/mypack/car_parts/gt_wing.json:
{
  "slot": "rear_wing",
  "aero": {
    "rear": [0.6, 1.6],
    "front": 0.1,
    "angle": 0.4
  }
}front/rear— how hard it presses the front and rear down. Bigger is stronger (0 to 3). 1 is about 190 kg at 200 km/h- Guide: 0.3–0.6 in total for a road car with a wing, 2–3 for a GT race car
angle— where the "Angle" slider starts (0–1, default 0.5). The angle changes driving only; the object does not move- More downforce makes fast corners quicker but lowers top speed. Drag follows automatically, so there is nothing to write for it
- More at the front turns in harder (oversteer); more at the rear is more stable (understeer)
The parts screen shows the part's downforce and how balance, grip and estimated top speed change.
オブジェクトに別の名前を付けたい・1 つの部品で複数のオブジェクトを出したい
名前は part_<部品名>(例 part_gt_wing)でも通ります。どちらの決まりにも合わない名前にしたいときは、車の vehicles/<車>.json に対応を書きます。
"parts": {
  "mypack:twin_muffler": { "show": ["part_exhaust-twin", "part_exhaust-twin_tip"] }
}
show に書けるのは part_ で始まる名前だけです。
Free object names, or several objects for one part
part_<part> (e.g. part_gt_wing) works too. For any other name, map it in the car's vehicles/<car>.json:
"parts": {
  "mypack:twin_muffler": { "show": ["part_exhaust-twin", "part_exhaust-twin_tip"] }
}
Only names starting with part_ are allowed in show.
最初から付いている部品にしたい(初期装備)
車の諸元 data/mypack/cars/<車>.json の、values と同じいちばん外側に書きます。
{
  "values": { "mass": 1250 },
  "default_parts": {
    "rear_wing": "mypack:s15_spoiler",
    "exhaust": { "part": "mypack:stock_muffler", "removable": false }
  }
}- 換装画面の「純正」が初期装備になる。外せる初期装備のある場所には「なし」も並ぶ
"removable": falseなら外せない。外すと穴だけ残る部品に使う- 置いてある車にも効く。パックで初期装備を変えれば、すでに置いた車も変わる
Have it fitted from the start (default parts)
Put them in the car's spec, data/mypack/cars/<car>.json, at the top level next to values:
{
  "values": { "mass": 1250 },
  "default_parts": {
    "rear_wing": "mypack:s15_spoiler",
    "exhaust": { "part": "mypack:stock_muffler", "removable": false }
  }
}- "Stock" in the parts screen becomes the default part. Slots with a removable default also get "None"
"removable": falsemeans it cannot come off. Use it for parts that would leave a hole- It reaches cars already placed: change the default in the pack and existing cars follow
仕組みを知りたい(なぜ全部を 1 つの OBJ に入れるのか)
ゲームは、車体の OBJ の中に入っている部品のオブジェクトを、表示・非表示で切り替えているだけです。付けている部品のオブジェクトだけを描き、残りは描きません。そのため:
- OBJ に入っていない部品は出せない。部品だけを別のファイルにして、あとから足すことはできない
- 非表示のまま書き出したオブジェクトは OBJ に入らないので、出せない
- 部品を 1 つ増やしたら、車体の OBJ を書き出し直す
- ほかの人の車には、部品パックだけでは外装パーツを足せない
うまくいかないとき
- 非表示のまま書き出さない。「選択物のみ」で書き出すと、非表示のオブジェクトは選べないので抜け落ちる
- 純正の部品も別のオブジェクトにする。
bodyに一体で残した部分は、付け替えても消えない - 部品の中の面に
light_tailなどのマテリアルを割り当てると、部品と一緒に光る(車の 3 章) carsで付けられる車種を絞れる。表示名はpart.<パック>.<部品名>
How it works (why everything goes into one OBJ)
The game only shows or hides part objects that are already inside the car's OBJ. It draws the objects of the fitted parts and skips the rest. So:
- A part that is not in the OBJ cannot appear. You cannot ship a part as a separate file and add it later
- An object exported while hidden is not in the OBJ, so it cannot appear either
- Adding a part means exporting the car's OBJ again
- A parts-only pack cannot add body parts to someone else's car
When it doesn't work
- Don't export with objects hidden. With "Selected Only", hidden objects cannot be selected and drop out
- Make stock pieces separate objects too. Anything left merged into
bodystays, whatever is fitted - Faces inside a part with a
light_tailmaterial light up with the part (chapter 3 of the Car guide) carslimits which cars can fit it. The display name ispart.<pack>.<part>
3マフラー
3Exhausts
見た目と排気音を変える部品です。走りは変わりません。
A part that changes the look and the exhaust note. Driving does not change.
最小のマフラーを作る
Make a minimal exhaust
- Blender車体の .blend の中に、マフラーを別のオブジェクトとして作る。名前は
part_exhaust-<部品名>(例part_exhaust-titanium) - Blender付け替え候補のマフラーを全部表示にして、車体と一緒に 1 つの OBJ に書き出す。
- ファイル部品のファイルを置く。
data/mypack/car_parts/titanium.json:{ "slot": "exhaust" } - lang表示名を lang に書く。
"part.mypack.titanium": "チタンマフラー"
これで、ゲームの G →「パーツ」→「マフラー」のタブに並びます。このままでは音はその車のままです。
- BlenderModel the exhaust as a separate object inside the car's .blend. Name it
part_exhaust-<part>(e.g.part_exhaust-titanium) - BlenderUnhide every selectable exhaust and export them together with the body, as one OBJ.
- FileAdd the part file
data/mypack/car_parts/titanium.json:{ "slot": "exhaust" } - langAdd the display name to lang.
"part.mypack.titanium": "Titanium exhaust"
It now appears under G → "Parts" → the "Exhaust" tab. The sound is still the car's own.
必要なときだけ
Only when you need it
音を低く・大きくしたい
見た目の JSON を置きます。assets/mypack/car_parts/titanium.json(素性と同じファイル名):
{
  "exhaust": {
    "pitch": [0.85, 1.00],
    "volume": 1.2,
    "tone": 0.3
  }
}pitch… 音の高さの倍率。1 未満で低くなる。[最小, 最大]で書くと、換装画面の「音の低さ」でその範囲を動かせるvolume… 音量の倍率(0〜2)tone… 「音の低さ」の最初の位置(0 でいちばん高い、1 でいちばん低い。省略で 0)- 下げるのは 0.78 くらいまでよく効く。上げるのはほとんど効かない(甲高くしたいなら、次の「音源ごと差し替えたい」)
Make it deeper or louder
Add a looks JSON, assets/mypack/car_parts/titanium.json (same file name as the definition):
{
  "exhaust": {
    "pitch": [0.85, 1.00],
    "volume": 1.2,
    "tone": 0.3
  }
}pitch— pitch multiplier; below 1 is deeper. Written as[min, max], the parts screen's "Deepness" slider moves within itvolume— volume multiplier (0 to 2)tone— where the "Deepness" slider starts (0 = highest, 1 = lowest; default 0)- Going down works well to about 0.78. Going up barely works (for a high-pitched exhaust, see "Use your own sound" below)
音源ごと差し替えたい
- 音源を置く(OGG・モノラル、継ぎ目なくループするもの)。
assets/mypack/sounds/titanium_exhaust.ogg - パックの
assets/mypack/sounds.jsonにサウンドイベントを書く:{ "titanium_exhaust": { "sounds": [{ "name": "mypack:titanium_exhaust" }], "attenuation_distance": 64 } } - 見た目の JSON の
exhaustで指す:{ "exhaust": { "sound": "mypack:titanium_exhaust" } }
高回転まで音程を伸ばしたいときは、1 オクターブ上の音源も作って "sound_high" で指します。sound_tools/make_octave_up.py で作れます。音源の作り方の詳しいことは車の 7 章と同じです。
Use your own sound
- Add the sound (OGG, mono, a seamless loop):
assets/mypack/sounds/titanium_exhaust.ogg - Declare a sound event in your pack's
assets/mypack/sounds.json:{ "titanium_exhaust": { "sounds": [{ "name": "mypack:titanium_exhaust" }], "attenuation_distance": 64 } } - Point to it from
exhaustin the looks JSON:{ "exhaust": { "sound": "mypack:titanium_exhaust" } }
To keep the pitch rising at high revs, also make a one-octave-up copy and point "sound_high" at it; sound_tools/make_octave_up.py makes one. More on making sounds in chapter 7 of the Car guide.
純正のマフラーも付け替えられるようにしたい
純正のマフラーも別のオブジェクト(例 part_exhaust-stock)にして部品を作り、車の諸元 data/mypack/cars/<車>.json のいちばん外側で初期装備にします。外すと穴だけ残るなら、外せないようにします:
{
  "values": { ... },
  "default_parts": {
    "exhaust": { "part": "mypack:stock", "removable": false }
  }
}初期装備の詳しいことは2 章の「最初から付いている部品にしたい」にあります。
Make the stock exhaust swappable too
Make the stock exhaust a separate object too (e.g. part_exhaust-stock), give it a part, and make it a default part at the top level of the car's spec data/mypack/cars/<car>.json. If removing it would leave just a hole, make it non-removable:
{
  "values": { ... },
  "default_parts": {
    "exhaust": { "part": "mypack:stock", "removable": false }
  }
}
More on default parts in chapter 2, "Have it fitted from the start".
うまくいかないとき
- 「マフラー」のタブが出ない … OBJ にそのオブジェクトが入っていない。非表示のまま書き出していないか見る
- 差し替えた音が鳴らず、いつもの音のまま …
soundの名前がsounds.jsonに無い。ログに警告が 1 行出ている pitchを 1 より大きくしても高くならない … Minecraft の音程の上限に当たっている。高い音源をsoundで差し替える
When it doesn't work
- No "Exhaust" tab — the object is not in the OBJ. Check it was not hidden when you exported
- Your sound does not play; it is the usual one — the
soundname is missing fromsounds.json. A warning is in the log pitchabove 1 does not raise it — Minecraft's pitch ceiling. Replace the source with a higher one viasound
付録 A. 部品の全項目
Appendix A. Every part key
素性 — data/<pack>/car_parts/<part>.json
Definition — data/<pack>/car_parts/<part>.json
| キー | 型 | 既定値 | 意味 |
|---|---|---|---|
slot | 文字列 | 必須 | 付ける場所。"wheel"・"tire"・"turbo"・"blowoff"・"front_bumper"・"side_skirt"・"fender"・"rear_wing"・"rear_diffuser"・"exhaust" |
order | 整数 | 100 | 換装画面に並ぶ順 |
cars | 車種 id の配列 | (すべての車種) | 付けられる車種。読める値が 1 つも無ければ、その部品は捨てられる |
turbo.boost | 数字 | 0.35 | ターボだけ。ブーストいっぱいでトルクを何割増やすか(0〜1.5) |
turbo.spool_from | 数字 | 0.25 | ターボだけ。過給が立ち上がり始める回転の割合(アイドル 0〜レブ 1) |
turbo.spool_full | 数字 | 0.60 | ターボだけ。過給がいっぱいになる回転の割合 |
turbo.spool_rate | 数字 | 3.0 | ターボだけ。ブーストが上がる速さ [1/秒](0.1〜20) |
tire.stiffness | 数字 | 1 | タイヤだけ。横・縦の剛性の倍率(よれやすさ。0.3〜3.0) |
tire.grip.<路面> | 数字 | 1 | タイヤだけ。その路面でのグリップの倍率。路面は paved・dirt・gravel・sand・snow・ice |
tire.rolling.<路面> | 数字 | 1 | タイヤだけ。その路面での転がり抵抗の倍率 |
aero.front / aero.rear | 数字 or [最小, 最大] | 0 | 外装パーツだけ。その軸のダウンフォースの面積 [m²](0〜3)。範囲なら角度で調整できる(パーツの 2 章) |
aero.angle | 数字 | 0.5 | 外装パーツだけ。調整していないときの角度(0〜1) |
| Key | Type | Default | Meaning |
|---|---|---|---|
slot | string | required | Where it fits: "wheel", "tire", "turbo", "blowoff", "front_bumper", "side_skirt", "fender", "rear_wing", "rear_diffuser" or "exhaust" |
order | integer | 100 | Position in the parts screen |
cars | array of car ids | (every car) | Which cars can fit it. If none of the values can be read, the part is dropped |
turbo.boost | number | 0.35 | Turbos only. Extra torque at full boost (0 to 1.5) |
turbo.spool_from | number | 0.25 | Turbos only. Where boost starts to build, as a fraction from idle (0) to the rev limit (1) |
turbo.spool_full | number | 0.60 | Turbos only. Where boost is full |
turbo.spool_rate | number | 3.0 | Turbos only. How fast boost builds [1/s] (0.1 to 20) |
tire.stiffness | number | 1 | Tyres only. Scale on lateral and longitudinal stiffness (tread squirm; 0.3 to 3.0) |
tire.grip.<surface> | number | 1 | Tyres only. Grip on that surface. Surfaces: paved, dirt, gravel, sand, snow, ice |
tire.rolling.<surface> | number | 1 | Tyres only. Rolling resistance on that surface |
aero.front / aero.rear | number or [min, max] | 0 | Body parts only. Downforce area on that axle [m²] (0 to 3). A range is adjustable by angle (chapter 2 of the Parts guide) |
aero.angle | number | 0.5 | Body parts only. Default angle (0 to 1) |
見た目 — assets/<pack>/car_parts/<part>.json("wheel": { ... } の中。入れ子を省いて、いちばん外側に書いてもよい。ホイールだけ。ターボとブローオフには要らない)
Looks — assets/<pack>/car_parts/<part>.json (inside "wheel": { ... }, or at the top level without the nesting). Wheels only; turbos and blow-off valves need none
| キー | 型 | 既定値 | 意味 |
|---|---|---|---|
model | id | その車種の wheel.model | ホイールの OBJ |
texture | id | その車種の wheel.texture | ホイールのテクスチャ |
designRadius | 数字 | その車種の designWheelRadius | メッシュが何 m の半径で作られているか |
offset | [x,y,z] | その車種の wheel.offset | 平行移動 [m]。X は外向き。X はオフセットのスライダーの既定値(−0.05 〜 0.10。外れたら端へ丸める) |
scale | 数字 1 つ or [x,y,z] | その車種の wheel.scale | X は太さ(スライダーの既定値。0.5 〜 2.5 に丸める)。Y・Z は触らない |
camber | 数字 | その車種の wheel.camber | キャンバー角 [度]。スライダーの既定値(−30 〜 10 に丸める) |
rimRadius | 数字 | (測る) | タイヤの内径(ビード)を置く半径 [m](メッシュの寸法)。3 章 |
タイヤの見た目 — assets/<pack>/car_parts/<part>.json("tire": { ... } の中。いちばん外側には書けない)
| キー | 型 | 既定値 | 意味 |
|---|---|---|---|
model | id | KurumaMod 標準のタイヤ | タイヤの OBJ(タイヤだけ。原点は車軸の中心) |
texture | id | kurumamod:textures/entity/wheel.png | タイヤのテクスチャ |
innerRadius | 数字 | (測る) | メッシュのタイヤの内径 [m]。測った値がおかしいときだけ書く |
outerRadius | 数字 | (測る) | メッシュのタイヤの外径 [m]。同上 |
| Key | Type | Default | Meaning |
|---|---|---|---|
model | id | the car's wheel.model | Wheel OBJ |
texture | id | the car's wheel.texture | Wheel texture |
designRadius | number | the car's designWheelRadius | The radius the mesh was built at, in m |
offset | [x,y,z] | the car's wheel.offset | Translation [m]. X points outward; it is the offset slider's default (−0.05 to 0.10, clamped) |
scale | one number or [x,y,z] | the car's wheel.scale | X is width (the slider's default, clamped to 0.5–2.5). Leave Y/Z alone |
camber | number | the car's wheel.camber | Camber [degrees]. The slider's default (clamped to −30 to 10) |
rimRadius | number | (measured) | Radius where the tyre's bead sits [m], in mesh units. Chapter 3 |
Tyre looks — assets/<pack>/car_parts/<part>.json (inside "tire": { ... }; not at the top level)
| Key | Type | Default | Meaning |
|---|---|---|---|
model | id | KurumaMod's own tyre | Tyre OBJ (tyre only, origin at the axle centre) |
texture | id | kurumamod:textures/entity/wheel.png | Tyre texture |
innerRadius | number | (measured) | The mesh's inner tyre radius [m]. Only write it if the measured one is wrong |
outerRadius | number | (measured) | The mesh's outer tyre radius [m]. Likewise |
マフラーの音 — assets/<pack>/car_parts/<part>.json("exhaust": { ... } の中。いちばん外側には書けない)
| キー | 型 | 既定値 | 意味 |
|---|---|---|---|
pitch | 数字 or [最小, 最大] | 1 | 音程の倍率(0.5〜1.5)。範囲なら「音の低さ」で動かせる |
volume | 数字 | 1 | 音量の倍率(0〜2) |
sound | id | (その車の音) | 排気音のサウンドイベント |
sound_high | id | (無し) | 高回転側(1 オクターブ上)のサウンドイベント |
tone | 数字 | 0 | 調整していないときの低さ(0〜1) |
Exhaust sound — assets/<pack>/car_parts/<part>.json (inside "exhaust": { ... }; not at the top level)
| Key | Type | Default | Meaning |
|---|---|---|---|
pitch | number or [min, max] | 1 | Pitch multiplier (0.5 to 1.5). A range is adjustable with "Deepness" |
volume | number | 1 | Volume multiplier (0 to 2) |
sound | id | (the car's) | Exhaust sound event |
sound_high | id | (none) | High-rev (one octave up) sound event |
tone | number | 0 | Default deepness (0 to 1) |
車の側 — 初期装備(data/<pack>/cars/<car>.json のいちばん外側)と対応(assets/<pack>/vehicles/<car>.json)
| キー | 型 | 意味 |
|---|---|---|
default_parts.<場所> | 部品 id or {"part": id, "removable": 真偽} | 何も付けていないときの部品。removable の既定は true |
parts.<部品 id>.show | オブジェクト名の配列 | その部品を付けたときに出すオブジェクト(part_ で始まる名前だけ) |
On the car — default parts (top level of data/<pack>/cars/<car>.json) and mapping (assets/<pack>/vehicles/<car>.json)
| Key | Type | Meaning |
|---|---|---|
default_parts.<slot> | part id or {"part": id, "removable": bool} | The part fitted when nothing is chosen. removable defaults to true |
parts.<part id>.show | array of object names | Objects shown while that part is fitted (names starting with part_ only) |
KurumaMod — 諸元の全項目は車の付録 A。ゲージスクリプトは modeling_tools/blender_gauge.py と modeling_tools/blender_wheel_gauge.py。
KurumaMod — every spec key is in Appendix A of the Car guide. The gauge scripts are modeling_tools/blender_gauge.py and modeling_tools/blender_wheel_gauge.py.