最小の車を作る
Make a minimal car
新しい車を 1 台ゲームに出すのに、これだけは要るという流れです。各手順の詳しいことは、手順の最後にある章にあります。ここでは、パックの名前を mypack、車種の名前を ae86 とします。
The bare minimum to get one new car into the game. Each step links to the chapter with the details. Here the pack is called mypack and the car ae86.
手順
Steps
- Blenderゲージを置く。→ 1 章
- Blenderゲージのタイヤに合わせて車体を作る。原点は「地面の高さ・前後輪の中間・左右の中央」→ 2 章
- Blender車体を
ae86.objに書き出す。Selected Onlyだけ入れて、ほかは既定のまま → 5 章 - ファイル見本の
carpack/example/をフォルダごとコピーし、kurumamod_example_carpackをすべてmypackに置き換える。フォルダ名 2 つ(assets/の下とdata/の下)、いちばん上のロゴ画像のファイル名、そしてすべてのファイルの中身(toml と、JSON の中のパス)。使える文字はa-z・0-9・_だけ → 6 章 - ファイル車体を置く。
ae86.objとae86.mtlをassets/mypack/models/entity/に、テクスチャをassets/mypack/textures/entity/ae86.pngに。絵がまだ無ければ、白く塗った小さな PNG でよい → 4 章 - ファイル見た目の JSON を書く。
assets/mypack/vehicles/sample.jsonをae86.jsonに改名して、中身をこうする:
タイヤは KurumaMod のものを借りている → 6 章{ "body": { "model": "mypack:models/entity/ae86.obj", "texture": "mypack:textures/entity/ae86.png" }, "wheel": { "model": "kurumamod:models/entity/wheel.obj", "texture": "kurumamod:textures/entity/wheel.png" } } - ファイル諸元の JSON を書く。
data/mypack/cars/sample.jsonをae86.json(見た目の JSON と同じ名前)に改名して、中身をこうする:
書いていない項目は既定の車と同じになる → 8 章{ "values": { "mass": 1200.0 } } - lang表示名を lang に書く。
assets/mypack/lang/ja_jp.jsonとen_us.jsonに"car.mypack.ae86": "AE86"→ 6 章 - ファイルフォルダの中身を jar に固めて、
mods/に入れる。フォルダごとではなく中身を固める → 共通の 4 章 - ゲーム起動して、クリエイティブの「KurumaMod」タブから車を出して乗る。→ 共通の 5 章
これで、自分の車体で、既定の車と同じように走る車が 1 台増えます。
- BlenderPlace the gauge. → chapter 1
- BlenderBuild the body around the gauge wheels. Origin at ground level, halfway between the axles, on the centreline → chapter 2
- BlenderExport the body as
ae86.obj. Tick onlySelected Only; leave the rest at defaults → chapter 5 - FileCopy the whole
carpack/example/folder and replace everykurumamod_example_carpackwithmypack. That is two folder names (underassets/and underdata/), the file name of the logo image at the top, and the contents of every file (the toml files and the paths inside the JSON). Use onlya-z,0-9and_→ chapter 6 - FilePut the body in place.
ae86.objandae86.mtlgo inassets/mypack/models/entity/, the texture inassets/mypack/textures/entity/ae86.png. No art yet? A small all-white PNG will do → chapter 4 - FileWrite the look JSON. Rename
assets/mypack/vehicles/sample.jsontoae86.jsonand make it:
The wheels are borrowed from KurumaMod → chapter 6{ "body": { "model": "mypack:models/entity/ae86.obj", "texture": "mypack:textures/entity/ae86.png" }, "wheel": { "model": "kurumamod:models/entity/wheel.obj", "texture": "kurumamod:textures/entity/wheel.png" } } - FileWrite the spec JSON. Rename
data/mypack/cars/sample.jsontoae86.json(same name as the look JSON) and make it:
Anything not written stays as on the default car → chapter 8{ "values": { "mass": 1200.0 } } - langAdd the display name to lang:
"car.mypack.ae86": "AE86"inassets/mypack/lang/en_us.jsonandja_jp.json→ chapter 6 - FileZip the folder's contents into a jar and put it in
mods/. Zip what is inside the folder, not the folder itself → chapter 4 of Common - GameStart the game, take the car from the "KurumaMod" creative tab and get in. → chapter 5 of Common
You now have one more car: your body, driving like the default car.
必要なときだけ
Only when you need it
jar を作らずに、まず見た目だけ確かめたい
リソースパックで KurumaMod の既定の車を自分の車体に差し替えれば、jar を作らずに F3+T で何度でも試せます。手順は6 章の「A」にあります。
Check the looks first, without building a jar
Override KurumaMod's built-in car with your body using a resource pack. No jar needed, and F3+T reloads it as often as you like. See route "A" in chapter 6.
もっと作り込みたい
Go further
| What you want | Where |
|---|---|
| Working lights, see-through windows, reflecting mirrors | Chapter 3 |
| Paint a texture | Chapter 4 |
| Fix the seat position or the body size | Chapter 6 |
| Change the engine sound | Chapter 7 |
| Change how it drives (weight, engine, suspension) | Chapter 8 |
| Fit your own wheels | Chapter 1 of the Wheel guide |
| Make wings or bumpers swappable | Chapter 2 of the Parts guide |
直したものを入れ直したい
assets/の中(モデル・テクスチャ・見た目の JSON・lang)を直したら、ゲームで F3+Tdata/の中(諸元)を直したら、ゲームで/reload
jar に入れて試しているときは、jar を作り直して入れ替え、ゲームを起動し直します。
Reload what you changed
- After changing anything in
assets/(model, texture, look JSON, lang), press F3+T in game - After changing anything in
data/(the spec), run/reloadin game
If you are testing from a jar, rebuild the jar, swap it in and restart the game.
うまくいかないとき
- MOD 一覧に出ない … フォルダごと jar に固めた(
META-INF/が jar の直下にない)。またはmodIdに-や.を使った - タブに車が出ない …
data/mypack/cars/ae86.jsonの場所か、JSON の書き方が違う。理由はログに出る - 出てくるが、既定の車の姿のまま … 見た目の JSON のファイル名が諸元と違う。または
body.modelのパスか名前空間(mypack:)が違う - 表示名が
ae86のまま … lang のキーがcar.mypack.ae86になっていない - 車体が大きすぎ・小さすぎ・タイヤとずれる … ゲージに合わせて作れていない。
designWheelBaseとdesignWheelRadiusに実際の寸法を書く(6 章)
ほかの症状は共通の 6 章にあります。
When it doesn't work
- Not in the mod list — you zipped the folder itself (
META-INF/is not at the top of the jar), ormodIdcontains-or. - No car in the tab —
data/mypack/cars/ae86.jsonis in the wrong place or not valid JSON. The reason is in the log - It appears, but with the default car's body — the look JSON's file name differs from the spec's, or the
body.modelpath or namespace (mypack:) is wrong - The display name shows as
ae86— the lang key is notcar.mypack.ae86 - The body is too big, too small, or off from the wheels — it does not match the gauge. Write your real sizes into
designWheelBaseanddesignWheelRadius(chapter 6)
Other symptoms are in chapter 6 of Common.
1ゲージを置く
1Place the gauge
車体を作る前に、寸法の目安になる枠(ゲージ)を Blender に置きます。ゲージに合わせて作れば、JSON の寸法は既定のままで済みます。
Before you model, put a reference frame (the gauge) into Blender. Build to it and the sizes in the JSON can stay at their defaults.
やること
What to do
- Blender上の
Scriptingタブを開き、新規(New)を押す。 - Blender
modeling_tools/blender_gauge.pyの中身を全部貼り付けて、実行する。▶ を押すか Alt+P
これで、タイヤ 4 つ・地面・シャシー基準面がワイヤーフレームで置かれます。
- BlenderOpen the
Scriptingtab at the top and pressNew. - BlenderPaste the whole of
modeling_tools/blender_gauge.pyand run it. Press ▶ or Alt+P
Four wheels, the ground and the chassis plane now appear as wireframes.
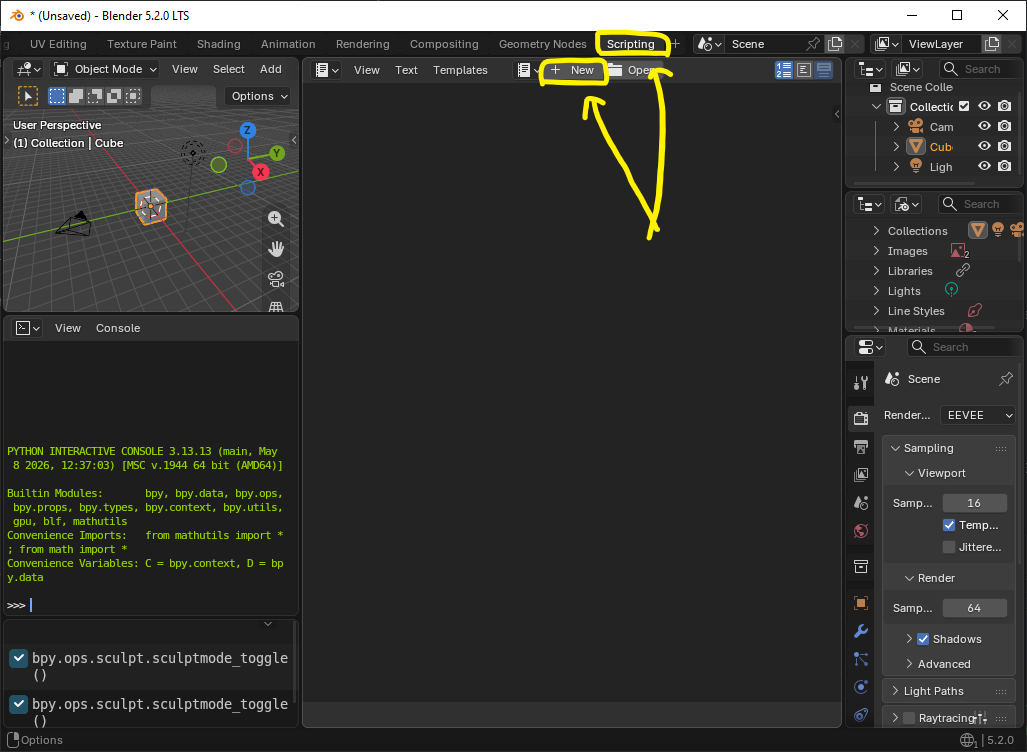
Scripting タブ(左上)を開き、New を押してから貼り付けますScripting tab (top left), press New, then paste.置かれるもの
What it places
| 名前 | 何か |
|---|---|
gauge_wheel_FL ほか 4 つ | タイヤの位置と大きさ。ここにタイヤハウスが来るように車体を作る |
gauge_ground | 地面(Z = 0)。ワールド原点はこの高さ |
gauge_chassis_plane | シャシー基準面(Z = 0.602m)。ゲームが車の「位置」とする高さ。4 隅が車軸の真上 |
| Name | What it is |
|---|---|
gauge_wheel_FL and 3 more | Where the wheels sit and how big they are. Build the wheel arches around these |
gauge_ground | The ground (Z = 0). The world origin is at this height |
gauge_chassis_plane | The chassis plane (Z = 0.602 m), the height the game treats as the car's position. Its corners sit right above the axles |
必要なときだけ
Only when you need it
ゲージを置き直したい
もう一度実行するだけです。前のゲージは消えてから置き直されます。
ゲージは選択できない設定になっています。作業中に間違って動かすことはなく、A で全部を選んでも入りません。
Place the gauge again
Just run it again. The old gauge is removed before the new one goes in.
The gauge cannot be selected. You cannot move it by accident, and A (select all) leaves it out.
ゲージの寸法を知りたい
| ホイールベース | 3.12 m(前後輪の距離) |
|---|---|
| トレッド | 1.80 m(左右輪の距離) |
| タイヤ半径 | 0.45 m(直径 90cm) |
| シャシー基準面 | 0.602 m |
実車より 2 割大きめです。Minecraft のプレイヤーはずんぐりしているので、実寸だと車が小さく見えるためです。
See the gauge's sizes
| Wheelbase | 3.12 m (front axle to rear axle) |
|---|---|
| Track | 1.80 m (left wheel to right wheel) |
| Wheel radius | 0.45 m (90 cm diameter) |
| Chassis plane | 0.602 m |
That is 20% bigger than a real car. Minecraft players are stocky, and a true-size car looks small next to them.
ゲージに合わせずに作りたい(作ってしまった)
それでも動きます。実際に作った寸法を、見た目の JSON の designWheelBase(ホイールアーチの前後の距離)と designWheelRadius(タイヤの半径)に書きます(6 章)。ゲームがその比で車体を拡大・縮小して、ゲージの大きさに合わせます。
Build without matching the gauge (or you already did)
It still works. Write the sizes you actually built into designWheelBase (distance between the arches) and designWheelRadius (wheel radius) in the look JSON (chapter 6). The game scales the body by that ratio to fit the gauge size.
実車と同じ大きさのゲージにしたい
スクリプトの先頭の SCALE = 1.2 を 1.0 にします。そのときは諸元(data/<pack>/cars/<car>.json)の wheel_base・track_width・wheel_radius も同じ寸法に揃えます(8 章)。揃えないと、タイヤだけが元の位置と大きさで出ます。
はじめての車では触らないでください。
Use a real-world-size gauge
Change SCALE = 1.2 at the top of the script to 1.0. Then set wheel_base, track_width and wheel_radius in the spec (data/<pack>/cars/<car>.json) to the same sizes (chapter 8). If you don't, the wheels still appear at the old positions and size.
Leave it alone for your first car.
ホイールを作りたい
ホイールは車体とは別のファイルで作り、専用のゲージ(modeling_tools/blender_wheel_gauge.py)を使います。ホイールの 1 章を見てください。
Build a wheel
Wheels are built in a separate file with their own gauge, modeling_tools/blender_wheel_gauge.py. See chapter 1 of the Wheel guide.
2車体を作る
2Build the body
車体のメッシュを作る章です。決まりは原点の位置と向きだけで、大きさと形は自由です。
This chapter is about modelling the body. The only rules are where the origin is and which way the car faces; size and shape are up to you.
最小の車体を作る
Make a minimal body
- Blender前を −Y、上を +Z に向けて作る。Blender の標準の向きのまま(テンキー 1 で正面から見た向き)
- Blenderワールド原点が「地面の高さ・前後輪のちょうど中間・左右の中央」に来るように置く。ゲージのとおりに作れば、そうなっている
- Blenderタイヤハウスを、ゲージのタイヤに合わせて切る。
これで、書き出せばゲームのタイヤと車体が合います。
- BlenderFace the car towards −Y with +Z up. That is Blender's default (numpad 1 looks at the front)
- BlenderPut the world origin at ground level, exactly halfway between the axles, on the centreline. If you follow the gauge, it already is
- BlenderCut the wheel arches around the gauge wheels.
Once exported, the body and the in-game wheels line up.
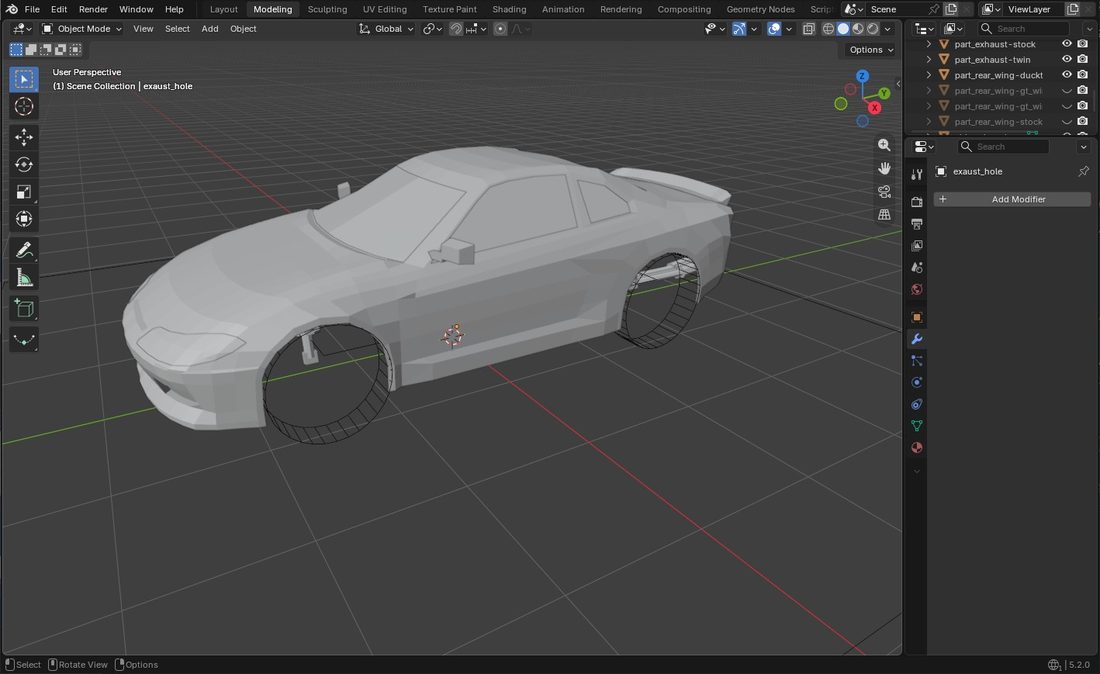
原点の 3 つの条件
The three origin rules
| 高さ | 地面(Z = 0)。車体の底ではない |
|---|---|
| 前後 | 前輪と後輪のちょうど中間。全長の中心とは限らない |
| 左右 | 中央 |
| Height | Ground level (Z = 0), not the underside of the body |
|---|---|
| Front–rear | Exactly halfway between the axles, not necessarily the middle of the overall length |
| Left–right | On the centreline |
合わせるのはワールド原点です。オブジェクトを選んだときに出るオレンジの点(オブジェクト原点)はどこにあっても構いません(共通の 3 章)。
What matters is the world origin. The orange dot you see on a selected object (its object origin) can be anywhere (chapter 3 of Common).
必要なときだけ
Only when you need it
原点がずれていたので直したい
車体を全部選び(A)、G で動かします。ゲージは選択できないので一緒には動きません。
Fix an origin that is off
Select the whole body (A) and move it with G. The gauge cannot be selected, so it stays put.
左右対称に半分だけ作りたい
ミラーモディファイアを使います。書き出しのときに自動で適用されるので、「適用」は押さなくてかまいません。
ただし、左右のドアミラーの鏡だけは別々のオブジェクトにします(3 章のミラー)。
Model half and mirror it
Use a mirror modifier. The exporter applies it for you, so you don't need to press "Apply".
The one exception is the glass of the two door mirrors, which must be separate objects (mirrors in chapter 3).
ボンネットやバンパーを別のオブジェクトに分けたい
分けても分けなくても同じです。ゲームは名前の決まっていないオブジェクトを全部まとめて車体として描きます。同梱の車体は作業のしやすさで body / hood / trunk / bumper_f / bumper_r に分けてあります。
ライト・ガラス・ミラー・付け替える部品だけは名前で働きが決まるので、別のオブジェクト(または別のマテリアル)にします(3 章)。
Split the bonnet or bumpers into their own objects
Split or not, it makes no difference. The game draws every object without a special name as body. The bundled body is split into body / hood / trunk / bumper_f / bumper_r only for convenience while modelling.
Lights, glass, mirrors and swappable parts are the exception: their names decide what they do, so they need their own objects (or materials) (chapter 3).
車内(内装)も作りたい
作らなくてもかまいません。何も作らなければ、車体の裏面がそのまま内装として見えます。作るなら、ふつうの車体として作れば描かれます。座席の位置は見た目の JSON の seat で決まり、座席のメッシュとは関係ありません(6 章)。
Model an interior
You don't have to. Without one, the back faces of the body show through and serve as the cabin. If you do model one, build it as ordinary body and it is drawn. Where the player sits comes from seat in the look JSON, not from any seat mesh (chapter 6).
ポリゴン数の目安を知りたい
あまり気にしなくてかまいません。同梱の車体は 671 面、タイヤは 344 面です。面は四角形のままにしておくと軽く描けます(5 章)。
How many polygons?
Don't worry much about it. The bundled body is 671 faces and the wheel 344. Keeping faces as quads draws faster (chapter 5).
うまくいかないとき
- 走るとタイヤがボディを突き抜ける … タイヤハウスがゲージのタイヤに合っていない
- 車体が地面に埋まる・浮く … 原点を車体の底に置いている。地面の高さ(Z = 0)へ動かす
- タイヤが前後にずれる … 原点が前後輪の中間にない。全長の中心に置いていないか見る
- 前後が逆・左右が鏡像 … 書き出しの
Forward Axisを触った(5 章)
When it doesn't work
- Tyres poke through the body when driving — the arches don't match the gauge wheels
- The body sinks into the ground or floats — the origin is at the underside of the body. Move it to ground level (Z = 0)
- The wheels sit too far forward or back — the origin is not halfway between the axles. Check you didn't use the middle of the overall length
- Front and back swapped, or mirrored —
Forward Axiswas changed on export (chapter 5)
3ライト・ガラス・ミラー(名前で決まる機能)
3Lights, glass and mirrors (names that do things)
オブジェクトに決まった名前を付けるだけで、ライトが光り、窓が透け、ミラーに後ろが映ります。JSON には何も書きません。
Give an object one of a few set names and it lights up, turns see-through or reflects what is behind. Nothing goes into the JSON.
ライトを光らせる
Make the lights work
- Blenderライトのレンズを別のオブジェクトにして、名前を付ける。ヘッドライトは
light_head、テールランプはlight_tail、バックランプはlight_reverse。左右で 1 つのオブジェクトでよい(ミラーモディファイアのままでよい) - Blenderレンズの面を、車体から 1〜2mm 浮かせる。
- Blenderレンズの UV は展開せず、1 点に潰してテクスチャの白い画素に置く。色はゲームが付ける
これで、L でヘッドライトが点き、テールランプはいつもうっすら光ってブレーキで明るくなり、ギアを R に入れるとバックランプが点きます。
- BlenderMake each lens its own object and name it.
light_headfor headlights,light_tailfor tail lights,light_reversefor reverse lights. One object for both sides is fine (a mirror modifier is fine) - BlenderFloat the lens faces 1–2 mm proud of the body.
- BlenderDon't unwrap the lens: collapse its UVs to one point on a white pixel of the texture. The game adds the colour
L now turns the headlights on, the tail lights glow dimly and brighten under braking, and the reverse lights come on in R.
light_ で始まる名前はこの 3 つだけ
light_fog のような名前を付けると、そこが穴になって何も描かれません。フォグランプは light_head に含めるか、ふつうの車体として作ります。
light_ NAMES
Name something light_fog and it becomes a hole where nothing is drawn. Fold fog lights into light_head, or model them as plain body.
窓を透けさせる
Make the windows see-through
- Blender窓を別のオブジェクトにして、名前を
glassで始める。glass・glass_side・glass.frontなど
これで、窓が透けます(濃さは 0.35)。
- BlenderMake the windows their own object and start the name with
glass.glass,glass_side,glass.frontand so on
The windows are now see-through (opacity 0.35).
ミラーに後ろを映す
Make the mirrors reflect
- Blender鏡を別のオブジェクトにして、名前を付ける。ルームミラーは
mirror_rear、ドアミラーはmirror_leftとmirror_right。筐体ごとの箱 1 つでよい - Blender左右のドアミラーは、別々のオブジェクトにする。ミラーモディファイアで 1 つにしたままにしない(適用してから分ける)
- Blender鏡になる面(いちばん広い平らな面)を、運転席のほうへ向ける。角度は合わせなくてよい
- ゲームH のメニューで、ミラーを入れる。既定は切
これで、ミラーに後ろの景色が実際に映ります。
- BlenderMake each mirror its own object and name it.
mirror_rearfor the rear-view mirror,mirror_leftandmirror_rightfor the door mirrors. One box for the whole housing is fine - BlenderKeep the two door mirrors as separate objects. Don't leave them joined by a mirror modifier (apply it, then separate)
- BlenderTurn the mirror face (the largest flat face) towards the driver. You don't need to aim it
- GameTurn mirrors on in the H menu. They are off by default
The mirrors now show what is really behind you.
mirror_rear)は室内なのでこの図には出ていませんmirror_rear) is inside the cabin, so it is not shown.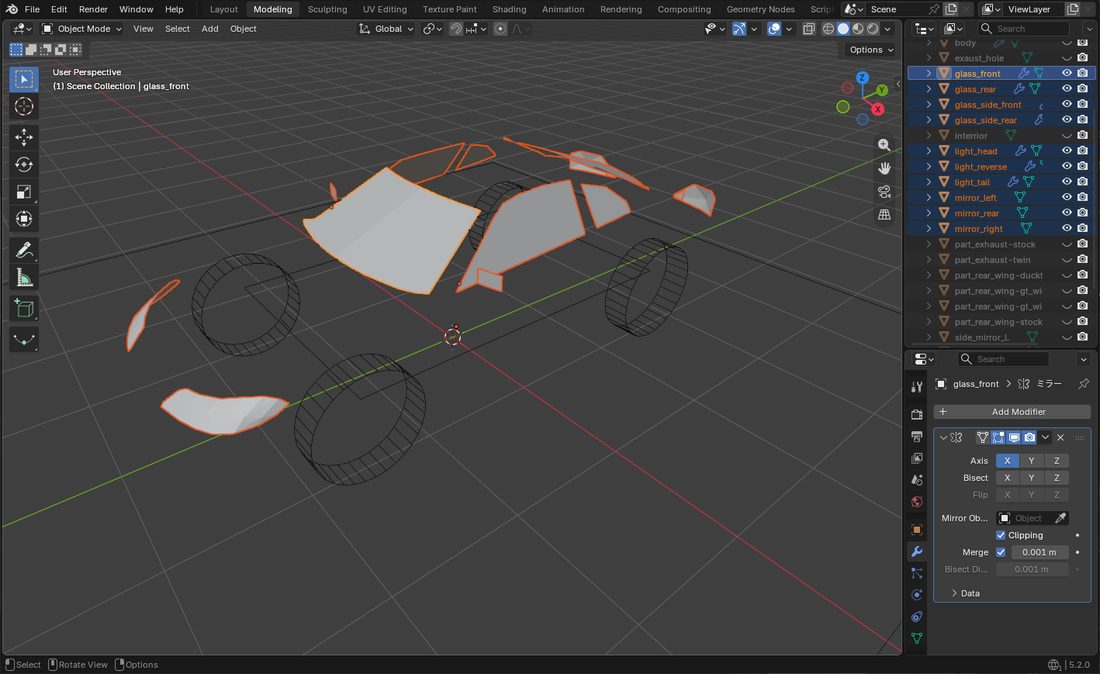
glass_…・light_…・mirror_…)だけを表示したところ。アウトライナーの名前が、そのままゲームの中の役目になりますglass_…, light_…, mirror_…). The names in the outliner are what the game reads.名前の一覧
All the names
| 名前 | なるもの |
|---|---|
light_head | ヘッドライト。L で点く。光の筋もここから出る |
light_tail | テールランプ。いつもうっすら、ブレーキで最大 |
light_reverse | バックランプ。ギアが R のとき |
glass で始まる | 半透明のガラス |
mirror_rear | ルームミラー |
mirror_left / mirror_right | ドアミラー |
part_ で始まる | 付け替える部品。その部品を付けているときだけ描かれる(パーツの 2 章) |
gauge_ で始まる | 捨てられる(ゲージが混ざっても描かれない) |
| それ以外 | 車体 |
| Name | What it becomes |
|---|---|
light_head | Headlight. L turns it on; the light beam starts here too |
light_tail | Tail light. Dim at all times, full under braking |
light_reverse | Reverse light. On in R |
starts with glass | Translucent glass |
mirror_rear | Rear-view mirror |
mirror_left / mirror_right | Door mirrors |
starts with part_ | A swappable part. Drawn only while that part is fitted (chapter 2 of the Parts guide) |
starts with gauge_ | Discarded, so a stray gauge is never drawn |
| anything else | Body |
必要なときだけ
Only when you need it
オブジェクトを分けずに、一部の面だけをライトやガラスにしたい
面に割り当てるマテリアルの名前を light_tail・glass・mirror_left などにします。その面だけがその働きになります。バンパーの一部の面をテールランプにする、といった使い方です。
- 編集モード(Tab)で面を選ぶ
- マテリアルタブでスロットを「+」で増やし、そのマテリアルを入れる
- 「割り当て」を押す
- オブジェクト名とマテリアル名が違う働きを指すときは、マテリアル名が勝ちます。役目の名前でないマテリアル(
bodyなど)なら、オブジェクト名の働きのまま - 名前の後ろの
.001は無視されます。light_tail.001もテールランプ - 書き出しの「マテリアル」の「書き出し」は入れたまま(既定で入っています)。外すと名前が OBJ に入りません
| オブジェクト名 | 面のマテリアル | その面 |
|---|---|---|
light_head | body | ヘッドライト |
light_head | glass | ガラス |
Bumper | light_tail | テールランプ |
Bumper | body | 車体 |
Turn just some faces into a light or glass, without splitting the object
Name the material on those faces light_tail, glass, mirror_left and so on. Only those faces take the role. A few faces of a bumper can become a tail light this way.
- Select the faces in Edit Mode (Tab)
- On the Material tab, add a slot with "+" and put the material in it
- Press "Assign"
- When the object name and the material name ask for different roles, the material wins. A material without a role name (
body, say) leaves the object's role in place - A trailing
.001is ignored:light_tail.001is still a tail light - Keep "Export Materials" ticked in the OBJ exporter (it is on by default), or the names never reach the OBJ
| Object name | Face material | That face |
|---|---|---|
light_head | body | Headlight |
light_head | glass | Glass |
Bumper | light_tail | Tail light |
Bumper | body | Body |
レンズの色を自分で塗りたい
レンズの UV を展開して、テクスチャに色を塗ります。展開したレンズは塗った色がそのまま出ます。
| レンズの UV | 色 |
|---|---|
| 1 点に潰す | ゲームが付ける(ヘッドは電球色、テールは赤、バックは白)。UV の場所を取らない |
| 展開する | テクスチャの色 |
どちらでも、点いたときの明るさと消えたときの暗さはゲームが付けます。テクスチャで暗く塗る必要はありません。
Paint the lens colour yourself
Unwrap the lens and paint it in the texture. An unwrapped lens shows exactly the painted colour.
| Lens UVs | Colour |
|---|---|
| Collapsed to one point | Set by the game (warm white head, red tail, white reverse). Uses no UV space |
| Unwrapped | From the texture |
Either way, the game handles how bright it is when on and how dim when off. Don't paint that into the texture.
ガラスの濃さを変えたい
窓にマテリアルを割り当てて、その Alpha を下げます(例 0.2 でもっと薄く、0.6 で濃く)。その値がそのまま濃さになります。Alpha が 1 のまま、またはマテリアルが無ければ 0.35 です。
書き出した .mtl を OBJ と一緒に置いてください。濃さはこのファイルが運びます。
Change how dark the glass is
Give the window a material and turn its Alpha down (0.2 for lighter, 0.6 for darker). That value is the opacity. With Alpha left at 1, or no material at all, it is 0.35.
Keep the exported .mtl next to the OBJ; it carries the opacity.
窓を何枚かのオブジェクトに分けたい
全部 glass で始めれば、何枚でもかまいません(glass.front / glass.front_side / glass.rear など)。glass のすぐ後ろに _ か . を置きます。glasshouse のように続けた名前はガラスになりません。
light_ と違い、glass の名前は自由に増やしても穴は開きません。
Split the windows into several objects
Any number is fine as long as each starts with glass (glass.front, glass.front_side, glass.rear and so on). Put _ or . right after glass; a name that runs straight on, like glasshouse, is not glass.
Unlike light_, new glass names never leave a hole.
ミラーの筐体と鏡を分けたい
筐体はふつうの名前(見本では body_mirror_left)にして、鏡の板だけを mirror_left にします。こうすると、どの面が鏡になるか迷いません。
筐体ごと 1 つの mirror_ にした場合は、いちばん広い平らな面だけが鏡になり、ほかの面はふつうの車体として描かれます。
Separate the mirror housing from the glass
Give the housing an ordinary name (body_mirror_left in the sample) and name only the glass plate mirror_left. Then there is no doubt about which face reflects.
If the whole housing is one mirror_ object, only its largest flat face reflects; the other faces are drawn as ordinary body.
ウイングなどの部品にライトを付けたい
部品のオブジェクト(part_…)の中の面に、ライトのマテリアルを割り当てます。GT ウイングのハイマウントストップランプなら light_tail です。ウイングを外せばランプも消えます。
部品の中のミラーは映りません(ふつうの面として描かれます)。部品の作り方はパーツの 2 章にあります。
Put a light on a part such as a wing
Assign a light material to faces inside the part object (part_…). For a high-mounted brake light on a GT wing, use light_tail. Take the wing off and the lamp goes with it.
Mirrors inside a part don't reflect (they are drawn as plain faces). How to make parts is in chapter 2 of the Parts guide.
仕組みを知りたい(ミラーに何が映るか)
- 何を映すかは、車に対して決まっています。板の角度は使いません。実車で乗った人がミラーを合わせるのと同じで、作った角度は「合わせる前の姿」です
- ルームミラーは真後ろを、1 度だけ下向きに映します
- ドアミラーは 1.5 度下向きで、地平線が鏡の中ほどより少し上に来ます。外へは、鏡の内側 15% に自分の車の横腹が映るところまで振ります
- 横に映る幅は決まっています(ルームミラー 34 度、ドアミラー 22 度)。縦は鏡の縦横比で決まり、横長に作るほど縦に狭くなります
- ルームミラーかドアミラーかは、名前ではなく鏡の位置で決まります。車の中心から左右 0.35m 以内ならルームミラーです。
left/rightの名前が実際の左右と逆でも正しく映ります - UV は要りません。面の中の位置がそのまま使われます
- 鏡ごとに、その位置から世界をもう一度描いています。左右のドアミラーを 1 つのオブジェクトにすると、左右で同じ景色が映るのはこのためです
How it works (what a mirror shows)
- What each mirror looks at is fixed relative to the car. The angle of the plate is not used. Like a real driver adjusting the glass after getting in, the angle you modelled is only the "before adjustment" pose
- The rear-view mirror looks straight back, 1° down
- Door mirrors look 1.5° down, putting the horizon a little above the middle of the glass. They are turned outward until your own car's flank fills the inner 15% of the glass
- The horizontal field of view is fixed (34° rear-view, 22° door). The vertical follows the glass's aspect ratio: the wider you make it, the narrower the vertical view
- Whether it is a rear-view or a door mirror is decided by where it is, not its name: within 0.35 m of the car's centreline it is the rear-view mirror. If
left/rightare swapped, it still reflects correctly - No UVs needed. The position within the face is used directly
- Each mirror redraws the world from its own position. That is why two door mirrors joined into one object show the same view
うまくいかないとき
- ライトを足したところが穴になる …
light_head/light_tail/light_reverse以外のlight_名を付けた - レンズがチラつく … レンズの面が車体と同じ面にある。1〜2mm 浮かせる
- レンズの色がおかしい … 展開した UV が、テクスチャの塗っていない場所を指している。1 点に潰して白い画素に置くか、テクスチャに色を塗る
- 窓が透けない … 名前が
glassで始まっていない(glasshouseのように続けていないか)。マテリアルの Alpha を使っているなら.mtlを一緒に置いたか - ミラーが映らない … H で入れたか。描画設定が「最高(Fabulous)」のときと、シェーダーパックを使っているときは映らない(暗いガラスになる)
- 左右のミラーに同じ景色が映る … ミラーモディファイアで 1 つのオブジェクトのまま。適用してから分ける
- ドアミラーが真後ろしか映さない … 鏡が車の中心から 0.35m 以内にあり、ルームミラーとして扱われている
- ログに役目が食い違うと出る … オブジェクト名とマテリアル名が違う働きを指している。マテリアルのほうが使われている
When it doesn't work
- A hole where you added a light — you used a
light_name other thanlight_head/light_tail/light_reverse - The lens flickers — the lens sits flush with the body. Float it 1–2 mm
- The lens is the wrong colour — its unwrapped UVs point at an unpainted part of the texture. Collapse them onto a white pixel, or paint the texture
- Windows aren't see-through — the name doesn't start with
glass(or runs straight on, likeglasshouse). If you use material Alpha, is the.mtlnext to the OBJ? - Mirrors show nothing — did you turn them on in H? They don't reflect with graphics set to "Fabulous" or with a shader pack (you get dark glass)
- Both door mirrors show the same view — they are still one object via a mirror modifier. Apply it and separate them
- A door mirror only looks straight back — it is within 0.35 m of the centreline, so it is treated as the rear-view mirror
- The log says roles disagree — the object name and the material name ask for different roles. The material's role is used
4テクスチャを貼る
4Add a texture
車体に色や模様を付ける章です。テクスチャが無くても車は走るので、形だけ先に作ってあとで貼ってもかまいません。
This chapter is about giving the body colour and detail. The car drives without a texture, so you can build the shape first and paint it later.
最小のテクスチャを貼る
Add a minimal texture
- Blender車体を UV 展開して、PNG のテクスチャに色を塗る。大きさは自由
- Blenderマテリアルを使っているなら、Base Color を白(1.0)にする。
- ファイルPNG を置き、見た目の JSON で指す。
assets/mypack/textures/entity/mycar.pngに置いて、assets/mypack/vehicles/mycar.jsonのbodyに書く:"body": { "model": "mypack:models/entity/mycar.obj", "texture": "mypack:textures/entity/mycar.png" }
これで、ゲームで F3+T を押すと車体にテクスチャが貼られます。
- BlenderUV-unwrap the body and paint a PNG texture. Any resolution
- BlenderIf you use materials, set Base Color to white (1.0).
- FilePut the PNG in place and point the look JSON at it. Save it as
assets/mypack/textures/entity/mycar.pngand write it intobodyinassets/mypack/vehicles/mycar.json:"body": { "model": "mypack:models/entity/mycar.obj", "texture": "mypack:textures/entity/mycar.png" }
Press F3+T in game and the body is textured.
必要なときだけ
Only when you need it
UV を張らずに、まず形だけ確かめたい
そのままでかまいません。UV 展開していない面は、テクスチャの 1 点の色で塗りつぶされます。絵がまだ無ければ、白く塗った小さな PNG を置いておけば足ります。
ライトのレンズは、UV を展開しないほうが都合がよいことがあります(3 章)。
Check the shape first, without UVs
That works as it is. Faces without UVs are filled with the colour of a single pixel of the texture. If you have no art yet, a small all-white PNG is enough.
For light lenses, leaving them unwrapped is often the better choice (chapter 3).
タイヤにも自分のテクスチャを使いたい
車体とタイヤは別々のテクスチャを指せます。見た目の JSON の wheel に書きます:
"wheel": { "model": "mypack:models/entity/mywheel.obj",
"texture": "mypack:textures/entity/mywheel.png" }タイヤのモデルの作り方はホイールの 1 章にあります。
Use your own texture on the wheels too
Body and wheels can point at different textures. Write it into wheel in the look JSON:
"wheel": { "model": "mypack:models/entity/mywheel.obj",
           "texture": "mypack:textures/entity/mywheel.png" }
How to model the wheel is in chapter 1 of the Wheel guide.
テクスチャを使わず、マテリアルの色だけで塗り分けたい
できます。マテリアルの Base Color が、テクスチャの色に掛け合わされて出ます。テクスチャを白一色にしておけば、マテリアルの色がそのまま出ます。書き出した .mtl を OBJ と一緒に置いてください。色はこのファイルが運びます。
Colour it with material colours only, no texture
You can. A material's Base Color is multiplied over the texture, so with an all-white texture the material colour comes through as is. Keep the exported .mtl next to the OBJ; it carries the colours.
うまくいかないとき
- テクスチャが暗い … マテリアルの Base Color が Blender の既定の 0.8 グレーのまま。白にする
- マテリアルの色が出ず、全体が白い …
.mtlを OBJ と一緒に置いていない。マテリアルを使わないつもりなら、それで問題ない - テクスチャが変わらない … F3+T を押したか。
textureのパスと名前空間(mypack:)が合っているか
When it doesn't work
- The texture comes out dark — the material's Base Color is still Blender's default 0.8 grey. Set it to white
- Material colours don't show; everything is white — the
.mtlis not next to the OBJ. If you don't use materials, that is fine - The texture doesn't change — did you press F3+T? Do the
texturepath and namespace (mypack:) match?
5OBJ に書き出す
5Export to OBJ
Blender の車体を、ゲームが読む OBJ ファイルにする章です。入れるチェックは 1 つだけで、あとは既定のままにします。
This chapter turns the Blender body into the OBJ file the game reads. You tick one box and leave everything else at its default.
やること
What to do
- Blender車体を全部選ぶ(A)。ゲージは選ばれない
- Blender
ファイル→エクスポート→Wavefront (.obj)を開く。 - Blender右のパネルで
Selected Onlyを入れる。ほかの設定は触らない。下の表のとおりになっているか見る - Blenderファイル名を付けて書き出す。例
mycar.obj - ファイルできた
.objと.mtlを、両方assets/mypack/models/entity/に置く。
これで、見た目の JSON(6 章)の body.model から指せる車体ができます。
- BlenderSelect the whole body (A). The gauge is not selected
- BlenderOpen
File→Export→Wavefront (.obj). - BlenderTick
Selected Onlyin the right-hand panel. Don't touch anything else. Check it matches the table below - BlenderName the file and export. For example
mycar.obj - FilePut both the
.objand the.mtlinassets/mypack/models/entity/.
You now have a body that body.model in the look JSON (chapter 6) can point at.
書き出しの設定
Export settings
| 項目 | どうする |
|---|---|
| Selected Only (古い版では Selection Only) | 入れる(ゲージを書き出さないため) |
| Forward Axis / Up Axis | 触らない(−Z / Y のまま) |
| Apply Modifiers | 触らない(入ったまま)。ミラーモディファイアがこれで適用される |
| Triangulated Mesh (古い版では Triangulate Faces) | 触らない(入れない)。四角形のままのほうが軽い |
| マテリアルの「書き出し」 | 触らない(入ったまま)。マテリアルの名前と色が .mtl に入る |
| Setting | Do this |
|---|---|
| Selected Only (older versions: Selection Only) | Tick it (keeps the gauge out) |
| Forward Axis / Up Axis | Leave alone (−Z / Y) |
| Apply Modifiers | Leave alone (on). This applies the mirror modifier |
| Triangulated Mesh (older versions: Triangulate Faces) | Leave alone (off). Quads draw faster |
| Materials: Export | Leave alone (on). Material names and colours go into the .mtl |
必要なときだけ
Only when you need it
タイヤも書き出したい
タイヤは車体とは別のファイルに書き出します(例 mywheel.obj)。設定は車体と同じです。作り方はホイールの 1 章にあります。KurumaMod のタイヤを借りるなら、書き出す必要はありません。
Export the wheel too
The wheel goes into a separate file from the body (for example mywheel.obj), with the same settings. How to build it is in chapter 1 of the Wheel guide. If you borrow KurumaMod's wheel, there is nothing to export.
.mtl は要るのか知りたい
.mtl は、マテリアルの色・ガラスの濃さ・マテリアル名で付けたライトなどの働きを運びます。どれも使っていなければ消してもかまいません。消すと全体が白(テクスチャの色そのまま)になります。
Do I need the .mtl?
The .mtl carries material colours, glass opacity, and roles given by material names (lights and so on). If you use none of those, you may delete it; everything then turns white (the texture as is).
三角形にして書き出したい・凹んだ面がある
三角形にしても描けますが、重くなるだけです。5 角形以上の面は、凹んでいても MOD が正しく割ります。全体を三角形にする必要はありません。
Triangulate on export, or the model has concave faces
Triangulating still works; it just makes the model heavier. The mod splits faces with five or more corners correctly, even concave ones. There is no need to triangulate everything.
仕組みを知りたい(なぜ Forward Axis を触ってはいけないか)
設定には −Z Forward と書いてありますが、Blender の前(−Y)は OBJ では +Z になって出てきます。この読み替えは MOD が済ませているので、既定のままで車は正しく前を向きます。
Forward Axis を変えると、前後と左右がまとめて裏返ります。車体は左右対称なので鏡像になっても気づけず、あとで「タイヤの向きだけおかしい」という形で出てきます。
How it works (why not to touch Forward Axis)
The dialog says −Z Forward, but Blender's front (−Y) actually comes out as +Z in the OBJ. The mod already accounts for that, so the defaults give a car facing the right way.
Changing Forward Axis flips front–back and left–right together. A symmetric body gives no clue it has been mirrored; it shows up later as "only the wheels point the wrong way".
うまくいかないとき
- 前後が逆・左右が鏡像 …
Forward Axisを変えた。既定(−Z / Y)へ戻して書き出し直す - ゲージが一緒に書き出された …
Selected Onlyを入れ忘れた。ゲージ(gauge_)は描かれないので害はないが、入れて書き出し直す - 片側しかない … ミラーモディファイアが適用されていない。
Apply Modifiersを入れたままにする - 付け替える部品(
part_…)が出ない … 非表示のまま書き出した。非表示のオブジェクトは選べないので OBJ に入らない。全部表示にしてから選ぶ(パーツの 2 章) - マテリアルの色やガラスの濃さが出ない …
.mtlを OBJ と同じ場所に置いていない - 面がねじれる・抜ける … 平面から大きく曲がった面か、辺が交差した面がある。Blender でその面だけ割る
When it doesn't work
- Front and back swapped, or mirrored —
Forward Axiswas changed. Put it back to −Z / Y and export again - The gauge was exported too —
Selected Onlywas off. Gauge objects (gauge_) are never drawn, so it is harmless, but tick it and export again - Only one half of the car — the mirror modifier was not applied. Keep
Apply Modifierson - A swappable part (
part_…) never appears — it was hidden when you exported. Hidden objects cannot be selected, so they are left out of the OBJ. Unhide everything before selecting (chapter 2 of the Parts guide) - Material colours or glass opacity missing — the
.mtlis not next to the OBJ - Faces twist or disappear — a face is badly non-planar or has crossing edges. Split just that face in Blender
6車をゲームに入れる(置き場所と JSON)
6Put the car in the game (files and JSON)
作ったモデルを、ゲームで走る車種にします。見本のパックをコピーして、名前と中身を入れ替えるのがいちばん早い道です。
This turns your model into a car you can drive in game. The quickest way is to copy the example pack and swap in your own names and files.
最小のカーパックを作る
Make a minimal car pack
ここでは、パックの名前を mypack、車種の名前を ae86 とします。
Here the pack is called mypack and the car ae86.
- ファイル
carpack/example/をフォルダごとコピーする。 - ファイル
kurumamod_example_carpackを、すべてmypackに置き換える。フォルダ名 2 つ(assets/の下とdata/の下)、いちばん上のロゴ画像kurumamod_example_carpack.pngのファイル名、そしてすべてのファイルの中身(META-INF/mods.toml・META-INF/neoforge.mods.tomlと、JSON の中のパス)です。使える文字はa-z・0-9・_だけ - ファイルモデルとテクスチャを置く。
assets/mypack/models/entity/ae86.obj(.mtlも一緒に)とassets/mypack/textures/entity/ae86.png - ファイル見た目の JSON を書く。
assets/mypack/vehicles/sample.jsonをae86.jsonに改名して、中身をこうする:{ "body": { "model": "mypack:models/entity/ae86.obj", "texture": "mypack:textures/entity/ae86.png" }, "wheel": { "model": "kurumamod:models/entity/wheel.obj", "texture": "kurumamod:textures/entity/wheel.png" } } - ファイル諸元の JSON を書く。
data/mypack/cars/sample.jsonをae86.jsonに改名して、中身をこうする(走りは8 章で詰める):{ "values": { "mass": 1200.0 } } - lang表示名を lang に書く。
assets/mypack/lang/ja_jp.jsonとen_us.jsonに"car.mypack.ae86": "AE86" - ファイルjar に固めて
mods/に入れる。固め方は共通の 4 章
これで、クリエイティブタブに「AE86」が並び、自分の車体で走ります。
- FileCopy the whole
carpack/example/folder. - FileReplace every
kurumamod_example_carpackwithmypack. That is two folder names (underassets/and underdata/), the logo imagekurumamod_example_carpack.pngat the top, and the contents of every file (META-INF/mods.toml,META-INF/neoforge.mods.tomland the paths inside the JSON). Use onlya-z,0-9and_ - FileAdd the model and texture:
assets/mypack/models/entity/ae86.obj(with its.mtl) andassets/mypack/textures/entity/ae86.png - FileWrite the looks JSON. Rename
assets/mypack/vehicles/sample.jsontoae86.jsonand make it:{ "body": { "model": "mypack:models/entity/ae86.obj", "texture": "mypack:textures/entity/ae86.png" }, "wheel": { "model": "kurumamod:models/entity/wheel.obj", "texture": "kurumamod:textures/entity/wheel.png" } } - FileWrite the spec JSON. Rename
data/mypack/cars/sample.jsontoae86.jsonand make it (tune the handling in chapter 8):{ "values": { "mass": 1200.0 } } - langAdd the display name to lang:
"car.mypack.ae86": "AE86"inassets/mypack/lang/en_us.jsonandja_jp.json - FilePack it into a jar and put it in
mods/. See chapter 4 of the Common guide
"AE86" now appears in the creative tab and drives with your body.
できあがりの形:
What you end up with:
mypack.jar
├── META-INF/mods.toml              ← Forge 1.20.1 用
├── META-INF/neoforge.mods.toml     ← NeoForge 1.21.1 用
├── pack.mcmeta
├── assets/mypack/                  ← 見た目
│   ├── models/entity/ae86.obj
│   ├── models/entity/ae86.mtl
│   ├── textures/entity/ae86.png
│   ├── vehicles/ae86.json
│   └── lang/ja_jp.json, en_us.json
└── data/mypack/                    ← 走り
    └── cars/ae86.json
mypack.jar
├── META-INF/mods.toml <- for Forge 1.20.1
├── META-INF/neoforge.mods.toml <- for NeoForge 1.21.1
├── pack.mcmeta
├── assets/mypack/ <- looks
│ ├── models/entity/ae86.obj
│ ├── models/entity/ae86.mtl
│ ├── textures/entity/ae86.png
│ ├── vehicles/ae86.json
│ └── lang/en_us.json, ja_jp.json
└── data/mypack/ <- handling
└── cars/ae86.json名前がずれてもエラーは出ません。車種 id mypack:ae86 から、次の 3 つが決まります。1 つでもずれると、黙って既定の姿や名前になります。
A mismatched name gives no error. The car id mypack:ae86 fixes these three names; if one is off, the car quietly gets the default body or name.
| 名前 | |
|---|---|
| 諸元 | data/mypack/cars/ae86.json |
| 見た目 | assets/mypack/vehicles/ae86.json |
| 表示名の翻訳キー | car.mypack.ae86 |
| Name | |
|---|---|
| Spec | data/mypack/cars/ae86.json |
| Looks | assets/mypack/vehicles/ae86.json |
| Display-name translation key | car.mypack.ae86 |
必要なときだけ
Only when you need it
既定の車の見た目だけ差し替えたい(リソースパック)
新しい車種は増やさず、KurumaMod 付属の車を自分のモデルで上書きします。jar を作らずに済み、F3+T で何度でも入れ直せるので、モデルを試すのにも向いています。
- 次の形でフォルダを作る:
.minecraft/resourcepacks/MyCar/ ├── pack.mcmeta └── assets/kurumamod/ ├── models/entity/car.obj ← 自分の車体(.mtl も一緒に) ├── models/entity/wheel.obj ← 自分のタイヤ ├── textures/entity/car.png └── vehicles/car.json ← 見た目の JSON(書き方は最小のカーパックと同じ) pack.mcmetaを書く:{ "pack": { "description": "MyCar", "pack_format": 15 } }- ゲームの設定でリソースパックを有効にする
開発環境で試すときは run/resourcepacks/ に置きます。人に配るなら、最小のカーパックの形にします。
Only replace the look of the built-in car (resource pack)
Instead of adding a car, override KurumaMod's own car with your model. No jar to build, and F3+T reloads it as often as you like, so it is also handy for trying out a model.
- Make this folder:
.minecraft/resourcepacks/MyCar/ ├── pack.mcmeta └── assets/kurumamod/ ├── models/entity/car.obj <- your body (keep the .mtl with it) ├── models/entity/wheel.obj <- your wheel ├── textures/entity/car.png └── vehicles/car.json <- looks JSON (written as in the minimal car pack) - Write
pack.mcmeta:{ "pack": { "description": "MyCar", "pack_format": 15 } } - Enable the pack in the game's settings
In a development environment it goes in run/resourcepacks/. To hand the car to others, use the minimal car pack layout instead.
車体の大きさ・位置を合わせたい
ゲージ(1 章)にぴったり合わせて作ったなら、何も書かなくて済みます。合わせられなかったときは、見た目の JSON(assets/mypack/vehicles/ae86.json)のいちばん外側に、メッシュを実際に作った寸法を書きます。
{
  "body":  { "model": "mypack:models/entity/ae86.obj",
             "texture": "mypack:textures/entity/ae86.png" },
  "wheel": { "model": "kurumamod:models/entity/wheel.obj",
             "texture": "kurumamod:textures/entity/wheel.png" },

  "designWheelBase": 3.12,
  "designWheelRadius": 0.45,
  "designRideHeight": 0.6019
}designWheelBase… メッシュの前後のホイールアーチが何 m 離れているか(既定 3.12)。5.2m で作ってしまったなら5.2と書けば、既定の車の大きさに縮みますdesignWheelRadius… メッシュのタイヤが何 m の半径で作られているか(既定 0.45)designRideHeight… 車体をシャシー基準面から下げる量 [m](既定 0.6019)。車体が埋まる・浮くときに直す- どれも「この車の寸法」ではなく「メッシュの寸法」です。実際の寸法は諸元にあり、ゲームはその比でメッシュを拡大します
あとは body の中で細かく直せます:
"body": { "model": "...", "texture": "...",
          "offset": [0.0, 0.02, 0.0],
"scale": 1.05 }offset… 車体をずらす [m]。[x, y, z]で +X 右・+Y 上・−Z 前scale… 大きさの微調整。数字 1 つでも[x, y, z]でもよい。原点が地面なので上へ伸びる
大きい車にしたいときは、ここではなく諸元を変えます。ゲームの調整画面でホイールベースとトレッドを広げ、body.scale を同じ倍率にします(1.2 倍なら 3.12→3.74m、1.8→2.16m、scale 1.2)。
Make the body the right size and position
If you built exactly to the gauge (chapter 1), there is nothing to write. If not, write the sizes you actually built the mesh at at the top level of the looks JSON (assets/mypack/vehicles/ae86.json):
{
  "body":  { "model": "mypack:models/entity/ae86.obj",
             "texture": "mypack:textures/entity/ae86.png" },
  "wheel": { "model": "kurumamod:models/entity/wheel.obj",
             "texture": "kurumamod:textures/entity/wheel.png" },

  "designWheelBase": 3.12,
  "designWheelRadius": 0.45,
  "designRideHeight": 0.6019
}designWheelBase— how far apart the front and rear arches are in your mesh, in m (default 3.12). If you built it at 5.2 m, write5.2and it shrinks to the default car's sizedesignWheelRadius— the radius your mesh's tyre was built at, in m (default 0.45)designRideHeight— how far to drop the body below the chassis plane, in m (default 0.6019). Change it if the body sinks or floats- These describe the mesh, not the car. The car's real sizes are in the spec, and the game scales the mesh by the ratio
Then fine-tune inside body:
"body": { "model": "...", "texture": "...",
          "offset": [0.0, 0.02, 0.0],
"scale": 1.05 }offset— shift the body, in m.[x, y, z]with +X right, +Y up, −Z forwardscale— fine size adjustment; one number or[x, y, z]. The origin is on the ground, so it grows upward
For a bigger car, change the spec instead. Widen the wheelbase and track in the game's tuning screen, and set body.scale to the same ratio (for 1.2×: 3.12→3.74 m, 1.8→2.16 m, scale 1.2).
座席の位置を直したい
見た目の JSON のいちばん外側に seat を書きます。運転席の位置で、助手席は左右反転で自動的に置かれます。
"seat": [0.5, -0.55, 0.2][x, y, z][m]。+X 右・+Y 上・−Z 前。既定は右ハンドル(x が正)- 前後(z)は前後輪の中点から、左右(x)と高さ(y)はシャシー基準面の中心から測る
- 足元の位置で、目線ではありません。一人称の視点はここから 1.62m 上に来ます。目線で決めたいなら 1.62 を引く
- 座面に合わせると視線が高くなり、目線に合わせると足が床下へ潜ります。どちらにするかは車ごとの好み
- メッシュから測るときは、
designWheelBaseなどで拡大・縮小された後の大きさで測る
Move the seat
Write seat at the top level of the looks JSON. It is the driver's seat; the passenger seat is mirrored automatically.
"seat": [0.5, -0.55, 0.2][x, y, z]in m, with +X right, +Y up, −Z forward. The default is right-hand drive (positive x)- Front-to-back (z) is measured from the midpoint of the axles; side (x) and height (y) from the centre of the chassis plane
- It is where the feet go, not the eyes. The first-person camera sits 1.62 m above it; subtract 1.62 to place the eye line instead
- Match the cushion and the view sits high; match the eye line and the feet sink through the floor. Pick per car
- If you measure from the mesh, measure it after the scaling from
designWheelBaseand friends
タイヤの見た目を変えたい(自前のタイヤ・ずらす・太さ・キャンバー)
見た目の JSON の wheel に書きます。
"wheel": { "model": "mypack:models/entity/ae86_wheel.obj",
           "texture": "mypack:textures/entity/ae86_wheel.png",
           "offset": [0.03, 0.0, 0.0],
           "scale": [1.2, 1.0, 1.0],
"camber": -2.0 }model/texture… 自前のタイヤ。kurumamod:で始めれば KurumaMod のものを借りられるoffset… タイヤをずらす [m]。X は「外向き」(左右で向きが反転する)。X は −0.05〜0.10 に丸められるscale… X が太さ(0.5〜2.5 に丸められる)。Y・Z(直径)は 1 のままにする。直径はゲームの調整画面のタイヤ半径で変えるcamber… キャンバー角 [度]。負で上が内側。−30〜10 に丸められる。見た目だけで、グリップは変わらない
プレイヤーは換装画面で太さ・キャンバー・オフセットを変えられます。ここに書くのはその最初の値です。
Change how the wheels look (own wheel, offset, width, camber)
Write it in wheel in the looks JSON.
"wheel": { "model": "mypack:models/entity/ae86_wheel.obj",
           "texture": "mypack:textures/entity/ae86_wheel.png",
           "offset": [0.03, 0.0, 0.0],
           "scale": [1.2, 1.0, 1.0],
"camber": -2.0 }model/texture— your own wheel. Start the path withkurumamod:to borrow KurumaMod'soffset— shift the wheels, in m. X is "outward" (it flips between sides). X is clamped to −0.05–0.10scale— X is width (clamped to 0.5–2.5). Leave Y and Z (diameter) at 1. Change the diameter with the tyre radius in the game's tuning screencamber— camber in degrees; negative leans the top inward. Clamped to −30–10. Looks only; grip does not change
Players can change width, camber and offset in the parts screen; what you write here is the starting value.
見た目の JSON に書ける項目を全部見たい
置き場所は assets/<パック>/vehicles/<車>.json。書かなかった項目は既定値になります。
| キー | 既定値 | 意味 |
|---|---|---|
body.model | 既定の車 | 車体の OBJ |
body.texture | 既定の車 | 車体のテクスチャ |
body.offset | [0,0,0] | 車体をずらす [m](+X 右・+Y 上・−Z 前) |
body.scale | 1.0 | 車体の大きさの微調整。数字 1 つか [x,y,z]。上へ伸びる |
wheel.model | 既定のタイヤ | タイヤの OBJ |
wheel.texture | 既定のタイヤ | タイヤのテクスチャ |
wheel.offset | [0,0,0] | タイヤをずらす [m]。X は外向き(−0.05〜0.10) |
wheel.scale | 1.0 | X は太さ(0.5〜2.5)。Y・Z は 1 のまま |
wheel.camber | 0.0 | キャンバー角 [度](−30〜10)。見た目だけ |
designWheelBase | 3.12 | メッシュのホイールアーチが何 m 離れているか |
designWheelRadius | 0.45 | メッシュのタイヤが何 m の半径で作られているか |
designRideHeight | 0.6019 | 車体をシャシー基準面から下げる量 [m] |
seat | [0.5, -0.55, 0.2] | 運転席の位置 [m]。右ハンドル。助手席は左右反転 |
shadowRadius | 1.4 | 影の大きさ |
sounds | KurumaMod の音 | 音の差し替え(7 章) |
parts | 名前の決まりどおり | 外装パーツの部品 id → 出すオブジェクト(パーツの 2 章) |
走りを決める値(車重・トルクなど)はここには書けません。data/ の諸元に書きます(8 章)。
See every key in the looks JSON
The file is assets/<pack>/vehicles/<car>.json. Anything you leave out takes the default.
| Key | Default | Meaning |
|---|---|---|
body.model | built-in car | Body OBJ |
body.texture | built-in car | Body texture |
body.offset | [0,0,0] | Shift the body [m] (+X right, +Y up, −Z forward) |
body.scale | 1.0 | Fine size adjustment; one number or [x,y,z]. Grows upward |
wheel.model | built-in wheel | Wheel OBJ |
wheel.texture | built-in wheel | Wheel texture |
wheel.offset | [0,0,0] | Shift the wheels [m]. X is outward (−0.05–0.10) |
wheel.scale | 1.0 | X is width (0.5–2.5). Leave Y and Z at 1 |
wheel.camber | 0.0 | Camber in degrees (−30–10). Looks only |
designWheelBase | 3.12 | How far apart the arches are in your mesh |
designWheelRadius | 0.45 | The radius your mesh's tyre was built at |
designRideHeight | 0.6019 | How far to drop the body below the chassis plane [m] |
seat | [0.5, -0.55, 0.2] | Driver's seat [m]. Right-hand drive; the passenger seat is mirrored |
shadowRadius | 1.4 | Size of the shadow |
sounds | KurumaMod's sounds | Replace sounds (chapter 7) |
parts | follows the naming rule | Body part id → objects to show (chapter 2 of the Parts guide) |
Handling values (mass, torque and so on) cannot go here. They go in the spec under data/ (chapter 8).
外装パーツを付けたい・最初から付けておきたい
見た目の JSON の parts(オブジェクト名の対応)と、諸元の JSON の default_parts(初期装備)を使います。書き方はパーツの 2 章にあります。
Add body parts, or fit them from the start
Use parts in the looks JSON (object names) and default_parts in the spec JSON (default parts). See chapter 2 of the Parts guide.
名前の決まりを詳しく知りたい
- 大文字と空白は使えない。名前空間(
mypack)はa-z 0-9 _ . -、車種名はこれに/を加えたもの modIdは名前空間より狭く、-も.も使えない(^[a-z][a-z0-9_]{1,63}$)。外れると読み込みがInvalid modIdで落ちる。区切りは_だけにする- 名前空間は
modIdと同じにする。違っても動くが、ほかのパックとぶつかったときにどちらが読まれるか分からなくなる - サブフォルダは使わない。
cars/toyota/ae86.jsonは id がmypack:toyota/ae86、翻訳キーがcar.mypack.toyota/ae86になる - lang を書かなければ、表示名は
ae86とそのまま出る - MOD 一覧に出る画像は
mods.tomlのlogoFileで指す
Naming rules in detail
- No uppercase, no spaces. Namespaces (
mypack) allowa-z 0-9 _ . -; car names allow those plus/ modIdis stricter: no-, no.(^[a-z][a-z0-9_]{1,63}$). Breaking that fails the load withInvalid modId. Use_as the only separator- Make the namespace the same as
modId. It works either way, but if two packs collide you cannot tell which one won - No subfolders.
cars/toyota/ae86.jsonbecomes the idmypack:toyota/ae86and the keycar.mypack.toyota/ae86 - Without a lang entry, the display name is simply
ae86 - The image in the mod list is
logoFileinmods.toml
Forge と NeoForge の両方で使いたい
見本をコピーしていれば、もうそうなっています。Forge 1.20.1 は META-INF/mods.toml だけを、NeoForge 1.21.1 は META-INF/neoforge.mods.toml だけを読むので、両方入れておけば同じ jar がどちらでも動きます。
- 2 つの中身はほぼ同じ。違うのはローダーの版(
loaderVersion)、Minecraft の版、依存の書き方(mandatory = trueがtype = "required")だけ pack.mcmetaに"supported_formats": [15, 48]を書く。無いと 1.21.1 で互換と見なされない
Work on both Forge and NeoForge
If you copied the example, it already does. Forge 1.20.1 reads only META-INF/mods.toml and NeoForge 1.21.1 reads only META-INF/neoforge.mods.toml, so with both inside, the same jar loads on either.
- The two files are nearly identical. Only the loader version (
loaderVersion), the Minecraft version, and how dependencies are written (mandatory = truebecomestype = "required") differ - Put
"supported_formats": [15, 48]inpack.mcmeta, or 1.21.1 will not treat the pack as compatible
見本の中身を知りたい・要らないものを消したい
| id | 何の見本か |
|---|---|
kurumamod_example_carpack:sample | 車体メッシュ・テクスチャ・灯火まで自前で持つ、一通り揃った車 |
kurumamod_example_carpack:sample_wheel | 自前のメッシュを持つホイールの部品(ホイールの 2 章) |
kurumamod_example_carpack:deep_dish | 換装画面のスライダーへ既定値を渡すホイールの部品 |
ホイールの部品が要らなければ、assets/mypack/car_parts/ と data/mypack/car_parts/ のファイル、wheel-sample.obj・.mtl、lang の part.… の行を消します。使わなくなった sample.obj なども消してかまいません。
隣の carpack/basic/ はプレイヤーへ配っている公式パックで、作りは同じです。出来上がったパックに何が入るかを見るのに向いています。
What is in the example, and what you can delete
| Id | What it demonstrates |
|---|---|
kurumamod_example_carpack:sample | A complete car — its own body mesh, texture and lights |
kurumamod_example_carpack:sample_wheel | A wheel part with its own mesh (chapter 2 of the Wheel guide) |
kurumamod_example_carpack:deep_dish | A wheel part that hands defaults to the fitment sliders |
If you do not want the wheel parts, delete the files in assets/mypack/car_parts/ and data/mypack/car_parts/, wheel-sample.obj and its .mtl, and the part.… lines in lang. Unused files such as sample.obj can go too.
carpack/basic/ next door is the official pack that ships to players, built the same way — a good look at what a finished pack contains.
仕組みを知りたい(なぜ見た目と走りでフォルダが分かれるのか)
assets/ はプレイヤーのゲームだけが読み、data/ はサーバーが読みます。誰も乗っていない車はサーバーが動かすので、走りを決める値は data/ に置きます。もし assets/ に置けたら、無人の車の動きが各プレイヤーのリソースパック次第になってしまいます。そのため、見た目の JSON に書けるのは見た目だけです。
jar 1 つにすれば、assets/ と data/ の両方が一緒に読まれます。
How it works (why looks and handling live in different folders)
assets/ is read only by each player's game; data/ is read by the server. The server drives cars nobody is in, so handling values belong in data/. If they could live in assets/, a driverless car would behave according to each player's resource pack. That is why the looks JSON can only describe appearance.
In a single jar, both assets/ and data/ are read together.
うまくいかないとき
- MOD 一覧に出ない …
modIdに-や.を使っていないか。META-INF/が jar の直下にあるか(共通の 4 章) - 車種が増えない …
data/mypack/cars/ae86.jsonの場所と、JSON の書き間違い。ログに理由が出る - 走るのに姿が既定の車のまま …
vehicles/の JSON のファイル名が車種名と同じか。modelの名前空間(mypack:)が合っているか - 表示名が
ae86のまま … lang のキーがcar.mypack.ae86になっているか - 車体だけ大きい・小さい …
designWheelBaseがメッシュの実寸か - 車体が埋まる・浮く …
designRideHeight。メッシュの原点が地面の高さにあるか - タイヤが大きすぎる・小さすぎる …
designWheelRadiusがメッシュの実寸か - 調整画面で寸法を変えたらタイヤがフェンダーからはみ出した … 仕様。タイヤは諸元に合わせて動き、車体は動かない。車体も合わせるなら
body.scale - 見た目の JSON に
massなどを書いても効かない … 走りの値はdata/の諸元に書く(8 章)
ほかの症状は共通の 6 章にあります。
When it doesn't work
- Not in the mod list — does
modIdcontain-or.? IsMETA-INF/at the top of the jar (chapter 4 of the Common guide)? - No new car — check where
data/mypack/cars/ae86.jsonis, and the JSON for typos. The reason is in the log - It drives but wears the default body — is the
vehicles/JSON named the same as the car? Does the namespace inmodel(mypack:) match? - The display name is just
ae86— is the lang keycar.mypack.ae86? - Only the body is too big or small — is
designWheelBasethe real size of your mesh? - The body sinks or floats —
designRideHeight. Is the mesh origin at ground level? - Wheels too big or small — is
designWheelRadiusthe real size of your mesh? - After changing sizes in the tuning screen, the wheels stick out of the fenders — expected. Wheels follow the spec; the body does not. Use
body.scaleto match the body massand the like in the looks JSON do nothing — handling values go in the spec underdata/(chapter 8)
More symptoms in chapter 6 of the Common guide.
7音を付ける
7Add sounds
エンジン音などを車ごとに差し替えます。書かなかった音は KurumaMod の音のままなので、この章は飛ばしてもかまいません。
Give a car its own engine note and other sounds. Anything you leave out stays KurumaMod's, so you can skip this chapter.
最小のエンジン音を付ける
Add a minimal engine sound
- ファイル音源を置く。
assets/mypack/sounds/ae86_exhaust.ogg。OGG・モノラルで、継ぎ目なくループするもの - ファイル高回転用の音源を作って、同じ場所に置く。同梱の道具を使う(Python が要る):
pip install numpy soundfile python sound_tools/make_octave_up.py ae86_exhaust.ogg # → ae86_exhaust_high.ogg - ファイル音に名前を付ける。
assets/mypack/sounds.json:{ "ae86_exhaust": { "category": "neutral", "subtitle": "subtitles.kurumamod.car_exhaust", "sounds": [{ "name": "mypack:ae86_exhaust", "attenuation_distance": 64 }] }, "ae86_exhaust_high": { "category": "neutral", "subtitle": "subtitles.kurumamod.car_exhaust", "sounds": [{ "name": "mypack:ae86_exhaust_high", "attenuation_distance": 64 }] } } - ファイル車の見た目の JSON から指す。
assets/mypack/vehicles/ae86.json(6 章)のいちばん外側に、手順 3 で付けた名前を書く:"sounds": { "exhaust": "mypack:ae86_exhaust", "exhaust_high": "mypack:ae86_exhaust_high" } - ゲームF3+T を押す。
これで、乗っている車のエンジン音がその場で入れ替わります。
- FileAdd the sound
assets/mypack/sounds/ae86_exhaust.ogg: Ogg Vorbis, mono, a seamless loop - FileMake the high-rpm copy and put it next to it, with the bundled tool (needs Python):
pip install numpy soundfile python sound_tools/make_octave_up.py ae86_exhaust.ogg # → ae86_exhaust_high.ogg - FileName the sounds in
assets/mypack/sounds.json:{ "ae86_exhaust": { "category": "neutral", "subtitle": "subtitles.kurumamod.car_exhaust", "sounds": [{ "name": "mypack:ae86_exhaust", "attenuation_distance": 64 }] }, "ae86_exhaust_high": { "category": "neutral", "subtitle": "subtitles.kurumamod.car_exhaust", "sounds": [{ "name": "mypack:ae86_exhaust_high", "attenuation_distance": 64 }] } } - FilePoint the car's looks JSON at them. At the top level of
assets/mypack/vehicles/ae86.json(chapter 6), write the names from step 3:"sounds": { "exhaust": "mypack:ae86_exhaust", "exhaust_high": "mypack:ae86_exhaust_high" } - GamePress F3+T.
The car you are in switches to the new engine sound on the spot.
ほかの音も同じやり方で差し替えられます。sounds に書ける名前:
Other sounds are replaced the same way. Names you can use in sounds:
| 名前 | 音 | 鳴り方 |
|---|---|---|
exhaust | エンジン音(低〜中回転) | ループ。回転数で音程、アクセルで音量が変わる |
exhaust_high | エンジン音(高回転) | ループ。exhaust を 1 オクターブ上げたもの |
road | ロードノイズ | ループ。車速 |
wind | 風切り音 | ループ。車速 |
slip / slip_chatter | タイヤの悲鳴(伸ばし/刻み) | ループ。舗装路で滑ったとき。滑り始めの 0.6 秒だけ刻みが鳴る |
gravel / sand | 砂利・土/砂・雪の路面音 | ループ。未舗装を走っているとき |
turbo | ターボの過給音(ヒュイーン) | ループ。ブーストで音程と音量が上がる。ターボの部品を付けたときだけ |
shift | 変速音 | 1 回 |
crash | 衝突音 | 1 回 |
blowoff | ブローオフ(プシュッ) | 1 回。ブーストが掛かった状態でアクセルを抜いたときとシフトアップのとき。ブローオフバルブの部品を付けたときだけ |
| Name | Sound | How it plays |
|---|---|---|
exhaust | Engine (low to mid rpm) | Loop. Pitch follows rpm, volume follows throttle |
exhaust_high | Engine (high rpm) | Loop. exhaust shifted up one octave |
road | Road noise | Loop. Speed |
wind | Wind | Loop. Speed |
slip / slip_chatter | Tyre squeal (sustained / chatter) | Loop. Sliding on tarmac; the chatter plays for the first 0.6 s of a slide |
gravel / sand | Gravel & dirt / sand & snow | Loop. Driving on loose ground |
turbo | Turbo spool whistle | Loop. Pitch and volume rise with boost. Only with a turbo part fitted |
shift | Gear change | One-shot |
crash | Impact | One-shot |
blowoff | Blow-off valve | One-shot. On a throttle lift or upshift under boost. Only with a blow-off valve part fitted |
必要なときだけ
Only when you need it
音源をうまく作りたい
- OGG Vorbis のモノラルにする。Audacity なら「トラック → ミックス → ステレオをモノラルにミックスダウン」してから OGG で書き出す
- ループ音は末尾を先頭へクロスフェードして、継ぎ目を消す。長さは 1 秒ほどあれば十分。短すぎると繰り返しが耳につく
- 音量は一定にする。ゲームがアクセルや車速で音量を動かすので、素材の中の強弱は二重に掛かって「うねる」
- エンジン音は少し高めに作る。アイドルで元の 0.65 倍、レブで約 3.9 倍の音程で鳴る。実車のアイドリングをそのまま使うと低すぎる
Make good source audio
- Ogg Vorbis, mono. In Audacity: Tracks → Mix → Mix Stereo Down to Mono, then export as OGG
- Cross-fade the tail of a loop into its head so there is no seam. About a second is plenty; much shorter and the repetition becomes audible
- Keep the level steady. The game drives volume from throttle and speed, so any swell inside the file is applied twice and the sound "wobbles"
- Build the engine a little high. It plays at 0.65× the original pitch at idle and about 3.9× at the redline; a straight recording of a real idle ends up too low
音の届く距離や字幕を変えたい
attenuation_distance… 音が届く距離 [ブロック]。書かなければ 16。KurumaMod はエンジン音 64・スキール 48・ロードノイズ 32subtitle… 字幕の翻訳キー。KurumaMod のもの(subtitles.kurumamod.car_exhaustなど)をそのまま借りられる。自分の lang に書いたキーでもよい"name"はsounds/からのパスで、拡張子を付けない
Change how far a sound carries, or its subtitle
attenuation_distance— how far it carries, in blocks (16 if left out). KurumaMod uses 64 for the engine, 48 for squeal, 32 for road noisesubtitle— the subtitle's translation key. You can borrow KurumaMod's (subtitles.kurumamod.car_exhaustand so on) or use one from your own lang"name"is the path undersounds/, without the extension
ターボやブローオフの音を変えたい
sounds に "turbo" / "blowoff" を書きます。変わるのは音だけです。鳴るかどうかは、その車にターボやブローオフバルブの部品が付いているかで決まります(パーツの 1 章)。
Change the turbo or blow-off sound
Write "turbo" / "blowoff" in sounds. Only the sound changes. Whether it plays depends on the car having a turbo or blow-off valve part fitted (chapter 1 of the Parts guide).
仕組みを知りたい(なぜ高回転用の音源が要るのか)
Minecraft は音程を 0.5〜2.0 倍までしか変えられません。1 つの音源ではレブまで音程が上がりきらないので、1 オクターブ上の音源を exhaust_high として並べ、回転に合わせて 2 つを入れ替えています。
make_octave_up.py は長さを半分にして 1 オクターブ上げます。ループはループのまま出てきます(継ぎ目は増えません)。ステレオを渡してもモノラルにして書きます。
How it works (why a high-rpm sound is needed)
Minecraft can only shift pitch between 0.5× and 2.0×, so one file cannot climb all the way to the redline. The game plays a one-octave-up copy as exhaust_high and cross-fades between the two with rpm.
make_octave_up.py halves the length to go up an octave. A seamless loop comes out seamless, and stereo input is written as mono.
うまくいかないとき
- 鳴らない … mp3 や wav になっていないか(OGG だけ鳴る)。
"name"に拡張子を付けていないか - いつもの音のまま …
soundsに書いた名前がsounds.jsonに無い。ログに警告が 1 行出ている。直したら F3+T - 離れても音が小さくならない … 音源がステレオ。モノラルにする
- 音がうねる … 音源の中で音量が揺れている。一定にする
- レブ付近で音程が上がりきらない …
exhaust_highを書いていない。書かないと高回転側にも同じ音源を使い、音程が 2 倍で頭打ちになる
When it doesn't work
- No sound — is it MP3 or WAV? Only OGG plays. Did you put the extension in
"name"? - Still the usual sound — the name in
soundsis missing fromsounds.json. A warning is in the log. Press F3+T after fixing - It stays loud far away — the file is stereo. Make it mono
- The sound wobbles — the level swells inside the file. Keep it steady
- The pitch stops rising near the redline —
exhaust_highis missing. Without it the same file plays on the high side, and the pitch caps at 2×
8諸元(走り)を書く
8Write the spec (how it drives)
加速・ブレーキ・曲がりかたを決める値(諸元)を書きます。置き場所は data/mypack/cars/<車>.json です。
This sets the values that decide acceleration, braking and cornering (the spec). They go in data/mypack/cars/<car>.json.
最小の諸元を作る
Make a minimal spec
- ゲーム車に乗り、G で調整画面を開いて、走りを詰める。
- ゲーム「プリセット」から名前を付けて保存する。
- ファイル
config/kurumamod-setups.jsonを開き、付けた名前の{ … }の中身をコピーする。中に"parts": { … }があれば、そこは除く - ファイル
data/mypack/cars/ae86.jsonのvaluesに貼る。{ "order": 10, "values": { "mass": 1500.0, "peak_torque": 200.0, "peak_torque_rpm": 3200.0, "redline_rpm": 5600.0 } } - ゲーム
/reloadを打つ。(F3+T ではない)
これで、クリエイティブタブから出したその車が、調整画面で詰めたとおりに走ります。
- GameGet in a car, press G to open the tuning screen, and dial in the handling.
- GameSave it under a name from "Preset".
- FileOpen
config/kurumamod-setups.jsonand copy what is inside the{ … }under your name. If there is a"parts": { … }inside, leave that out - FilePaste it into
valuesindata/mypack/cars/ae86.json.{ "order": 10, "values": { "mass": 1500.0, "peak_torque": 200.0, "peak_torque_rpm": 3200.0, "redline_rpm": 5600.0 } } - GameRun
/reload. (Not F3+T.)
The car, taken fresh from the creative tab, now drives the way you tuned it.
必要なときだけ
Only when you need it
変えたい項目だけ書きたい
Write only what you change
Anything you leave out takes the default, so keep only what differs from the default car. Old packs keep loading when KurumaMod adds parameters.
- Every key is listed in Appendix A
- Values that are ignored even if written (they follow from mass and the like) are in Appendix B
- You may skip
valuesand write the keys at the top level instead
手で数字を書きたい(単位)
ファイルには内部単位で書きます。角度はラジアンです。調整画面が度で見せている項目でも同じです。
| 種類 | 単位 |
|---|---|
| 長さ | m(cm ではない) |
| 質量 | kg |
| 角度 | rad(度ではない) |
| バネ定数 | N/m |
| トルク | N·m |
| 回転数 | rpm |
- 例: 最大切れ角 35 度は
"max_steer": 0.6109。32.0と書くと 32 ラジアンと読まれる - 調整画面の範囲から外れた値は、範囲の端に丸められる(ログに警告が出る)
Type the numbers by hand (units)
The file takes internal units. Angles are radians, even for parameters the tuning screen shows in degrees.
| Quantity | Unit |
|---|---|
| Length | m (not cm) |
| Mass | kg |
| Angle | rad (not degrees) |
| Spring rate | N/m |
| Torque | N·m |
| Engine speed | rpm |
- Example: 35° of steering lock is
"max_steer": 0.6109. Writing32.0is read as 32 radians - Values outside the tuning screen's range are clamped to the nearest end (the log warns you)
メモを残したい
_ で始まるキーは読み飛ばされます。JSON にはコメントが書けないので、これで理由を残せます。
{
  "values": {
    "_comment_mass": "バンなので既定より重くする",
    "mass": 1500.0
  }
}
Leave notes
Keys starting with _ are skipped. JSON has no comments, so this is how you leave a note.
{
  "values": {
    "_comment_mass": "A van, so heavier than the default",
    "mass": 1500.0
  }
}
クリエイティブタブでの並び順を変えたい
いちばん外側の order で決まります。小さいほど前(既定 100)。
Change the order in the creative tab
Set order at the top level. Smaller comes first (default 100).
最初から部品を付けておきたい
いちばん外側の default_parts に書きます(values と同じ階層)。書き方はパーツの 2 章にあります。
Fit parts from the start
Write default_parts at the top level, next to values. See chapter 2 of the Parts guide.
うまくいかないとき
- 直したのに走りが変わらない …
/reloadを打ったか。すでに置いてある車は置いたときの諸元のまま。クリエイティブタブから出し直す - その車種がタブから消えた … JSON が壊れている。
valuesに"parts"のような数でないものが混ざっていないか。理由はログに出る - 舵が異常に切れる・効かない … 角度を度で書いていないか(ラジアンで書く)
- 書いた値が効かない … 車重などから自動で決まる値かもしれない(付録 B)。見た目の JSON(
assets/)に書いていないか
When it doesn't work
- An edit changes nothing — did you run
/reload? A car already placed keeps the spec it was placed with; take a fresh one from the creative tab - The car vanished from the tab — the JSON is broken. Is something that is not a number, like
"parts", insidevalues? The reason is in the log - Steering is wild or dead — did you write an angle in degrees? Use radians
- A value has no effect — it may be one that follows from mass and the like (Appendix B). Or did you put it in the looks JSON under
assets/?
付録 A. 諸元の全項目(data/<pack>/cars/<car>.json)
Appendix A. Every spec key (data/<pack>/cars/<car>.json)
これで全部(57 項目)。書き方は 8 章。範囲は調整画面のスライダーの範囲と同じです。外れた値は、上に外れれば上限、下に外れれば下限へ丸めて読み込み、ログに 範囲(… 〜 …)の外なので … に丸めました と残します。
That is all of them (57 keys). How to write them is in chapter 8. The ranges are the same as the tuning screen's sliders. A value above the range is loaded as the maximum and one below as the minimum, and the log records 範囲(… 〜 …)の外なので … に丸めました ("outside the range, clamped to …").
サスペンション
| 名前 | 調整画面での名前 | 単位 | 既定 | 範囲 |
|---|---|---|---|---|
stroke | ストローク | m | 0.3 | 0.15 – 0.8 |
front_anti_roll | フロント スタビライザー | N/m | 2500 | 0 – 20000 |
rear_anti_roll | リア スタビライザー | N/m | 1500 | 0 – 20000 |
front_roll_center | フロント ロールセンター | 重心高に対する割合 | 0.4 | 0 – 0.8 |
rear_roll_center | リア ロールセンター | 重心高に対する割合 | 0.4 | 0 – 0.8 |
足を硬くしたいときは stroke を短くします。沈み込みがストロークの 39.2% で固定なので、短いほどバネが硬くなり、ダンパーの係数もそれに合わせて上がります。
ダンパー
| 名前 | 調整画面での名前 | 単位 | 既定 | 範囲 |
|---|---|---|---|---|
front_bump_damping | フロント 縮み側減衰 | 減衰比 | 0.45 | 0.1 – 1.5 |
front_rebound_damping | フロント 伸び側減衰 | 減衰比 | 0.45 | 0.1 – 1.5 |
rear_bump_damping | リア 縮み側減衰 | 減衰比 | 0.45 | 0.1 – 1.5 |
rear_rebound_damping | リア 伸び側減衰 | 減衰比 | 0.45 | 0.1 – 1.5 |
N·s/m ではなく減衰比(臨界減衰に対する割合)で書きます。係数はその輪のバネと荷重から KurumaMod が計算するので、stroke や mass を変えても効き方は変わりません。1 で揺り返しがちょうど出なくなる硬さ。実車は伸び側を縮み側の 1.5〜3 倍にすることが多く、そうすると段差を柔らかくいなしつつ揺れがすぐ収まります。
ステアリング ジオメトリ
| 名前 | 調整画面での名前 | 単位 | 既定 | 範囲 |
|---|---|---|---|---|
ackermann | アッカーマン率 | 割合(1 で幾何どおり) | 0.5 | −0.5 – 1.2 |
front_toe | フロント トー | rad(正でイン) | 0 | −0.00873 – 0.00873 |
rear_toe | リア トー | rad(正でイン) | 0 | −0.00873 – 0.00873 |
front_roll_steer | フロント ロールステア | rad/rad(正でアンダー) | 0.05 | −0.2 – 0.3 |
rear_roll_steer | リア ロールステア | rad/rad(正でアンダー) | 0.08 | −0.2 – 0.3 |
front_compliance_steer | フロント コンプライアンスステア | rad/G(正でアンダー) | 0.00873(=0.5°/G) | −0.00873 – 0.0262 |
rear_compliance_steer | リア コンプライアンスステア | rad/G(正でアンダー) | 0.00349(=0.2°/G) | −0.00873 – 0.0262 |
タイヤ
| 名前 | 調整画面での名前 | 単位 | 既定 | 範囲 |
|---|---|---|---|---|
friction | グリップ | μ | 1 | 0.3 – 1.5 |
tire_falloff | 滑ったときのグリップ低下 | 割合 | 0 | 0 – 0.5 |
tire_load_sensitivity | タイヤの荷重感度 | — | 0.15 | 0 – 0.4 |
cornering_stiffness | 横すべり剛性 | — | 12 | 4 – 25 |
longitudinal_stiffness | 縦すべり剛性 | — | 18 | 5 – 40 |
wheel_radius | タイヤ半径 | m | 0.45 | 0.25 – 1.1 |
friction に書くのは実際の摩擦係数(μ)です。調整画面は既定を 1.00 とした相対値で出しています(いまは基準が 1.0 なので同じ数字)。
車体
| 名前 | 調整画面での名前 | 単位 | 既定 | 範囲 |
|---|---|---|---|---|
mass | 車重 | kg | 1200 | 500 – 2500 |
weight_distribution | 前後の荷重配分 | 前軸の割合 | 0.56 | 0.35 – 0.7 |
wheel_base | ホイールベース | m | 3.12 | 2 – 7 |
track_width | トレッド | m | 2 | 1.2 – 4 |
エンジン
| 名前 | 調整画面での名前 | 単位 | 既定 | 範囲 |
|---|---|---|---|---|
peak_torque | 最大トルク | N·m | 350 | 60 – 700 |
peak_torque_rpm | 最大トルク回転数 | rpm | 4200 | 1500 – 8000 |
peak_power_rpm | 最高出力回転数 | rpm | 最大トルク回転数の 1.59 倍(6676.4) | 2500 – 12000 |
idle_rpm | アイドル回転数 | rpm | 800 | 500 – 2000 |
redline_rpm | レブリミット | rpm | 7000 | 4000 – 12000 |
engine_brake | エンジンブレーキ | N·m | 35 | 0 – 120 |
engine_inertia | エンジンの慣性 | kg·m² | 0.25 | 0.05 – 1 |
変速機
| 名前 | 調整画面での名前 | 単位 | 既定 | 範囲 |
|---|---|---|---|---|
gear_count | 前進の段数 | 段 | 5 | 3 – 8 |
first_gear | 1速のギア比 | — | 4.2 | 1.5 – 5 |
top_gear | 最高段のギア比 | — | 0.85 | 0.4 – 1.5 |
drivetrain_efficiency | 駆動系の伝達効率 | — | 0.9 | 0.7 – 1 |
shift_time | 変速にかかる時間 | 秒 | 0.35 | 0 – 1.5 |
manual_transmission | 変速 | 0 = AT・1 = MT | 0 | 0 – 1 |
駆動系・デフ
| 名前 | 調整画面での名前 | 単位 | 既定 | 範囲 |
|---|---|---|---|---|
drive_layout | 駆動方式 | 0 = FF・1 = FR・2 = 4WD | 2 | 0 – 2 |
torque_split | 前後トルク配分 | 後輪の割合(4WD のみ) | 0.5 | 0.1 – 0.9 |
diff_preload | デフ イニシャルトルク | N·m | 0 | 0 – 300 |
diff_lock_ratio | デフ 差動制限率 | — | 0 | 0 – 1 |
diff_coast_ratio | デフ 戻し側の効き | — | 0.5 | 0 – 1 |
center_diff_lock | センターデフ 締結の強さ | — | 0 | 0 – 1 |
diff_lock_ratio と diff_preload がどちらも 0 ならオープンデフ。diff_coast_ratio は 0 で 1way、0.5 で 1.5way、1 で 2way。
torque_split と center_diff_lock は 4WD(drive_layout が 2)のときだけ効きます。torque_split は前後へ配る駆動力の割合で、後ろへ寄せるほど踏んだときに尻が出やすくなります(FR 寄り)。center_diff_lock が 0 ならオープンで配分どおり、上げると前後の回転差を揃えにいき、空転しかけた軸から掴んでいる軸へトルクが移ります(1 で直結)。締めるほど配分の意味は薄れ、低速で小さく回ったときに止まろうとします(タイトコーナーブレーキング)。サイドブレーキを引いている間は自動で切れます。古い drive_bias(0 = FF・1 = FR・間は 4WD の配分)も読めます。
ブレーキ・走行抵抗
| 名前 | 調整画面での名前 | 単位 | 既定 | 範囲 |
|---|---|---|---|---|
abs | ABS | 強さ(0 で無効) | 0.7 | 0 – 1 |
rolling_resistance | 転がり抵抗 | — | 0.15 | 0 – 1 |
最高速の項目はありません。実際の最高速はトルクと抵抗から決まり、最高段でレブまで回した速度より速くは走れません。
空力
| 名前 | 調整画面での名前 | 単位 | 既定 | 範囲 |
|---|---|---|---|---|
drag_area | 空気抵抗(CdA) | m²(Cd×前面投影面積) | 0.78 | 0.2 – 5 |
front_downforce | ダウンフォース(前) | m²(−Cl×面積) | 0 | 0 – 3 |
rear_downforce | ダウンフォース(後) | m²(−Cl×面積) | 0 | 0 – 3 |
空気抵抗は力として掛かるので、同じ値でも重い車ほど減速しにくくなります。目安はスポーツカー 0.5、乗用車 0.7、SUV 1.0。以前の drag(減速度の係数)を書いたパックは、その車の車重で自動的に換算され、走りは変わりません。
ダウンフォースは前軸・後軸の位置で車体を下へ押し、速度の 2 乗で増えます。前を強くするとオーバー、後ろを強くするとアンダー。押し付けるぶん空気抵抗も増える(ダウンフォースの 1/6 が CdA に足される)ので、付けるほど最高速は落ちます。目安はウイング付きの市販車で前後合わせて 0.3〜0.6、GT 系のレーシングカーで 2〜3。
操作と補助
| 名前 | 調整画面での名前 | 単位 | 既定 | 範囲 |
|---|---|---|---|---|
max_steer | 最大切れ角 | rad | 0.6109(=35°) | 0.1745 – 1.1345 |
steer_grip_margin | 切れ角の余裕(大で滑らせやすい) | — | 1 | 0.8 – 8 |
visual_slip_limit | 見た目のタイヤ角 | rad(0 で無効) | 0.7854(=45°) | 0 – 1.5708 |
steer_rate | 舵が入るまでの時間 | 秒 | 0.18 | 0 – 1 |
steer_return | 舵が中立へ戻る時間 | 秒 | 0.11 | 0 – 1 |
self_aligning | 舵の自己復元 | —(0 で中立へ戻る) | 0 | 0 – 1 |
pedal_press | ペダルを踏みきる時間 | 秒 | 0.25 | 0 – 1 |
pedal_release | ペダルを戻しきる時間 | 秒 | 0.12 | 0 – 1 |
handbrake_press | サイドブレーキが効ききる時間 | 秒 | 0 | 0 – 1 |
traction_control | トラクションコントロール | 強さ(0 で無効) | 1 | 0 – 1 |
Suspension
| Name | On the tuning screen | Unit | Default | Range |
|---|---|---|---|---|
stroke | Travel | m | 0.3 | 0.15 – 0.8 |
front_anti_roll | Front anti-roll bar | N/m | 2500 | 0 – 20000 |
rear_anti_roll | Rear anti-roll bar | N/m | 1500 | 0 – 20000 |
front_roll_center | Front roll centre | fraction of CG height | 0.4 | 0 – 0.8 |
rear_roll_center | Rear roll centre | fraction of CG height | 0.4 | 0 – 0.8 |
To stiffen the suspension, shorten stroke. Static sag is fixed at 39.2% of the stroke, so a shorter stroke means stiffer springs, and the damper coefficients rise with them.
Dampers
| Name | On the tuning screen | Unit | Default | Range |
|---|---|---|---|---|
front_bump_damping | Front bump damping | damping ratio | 0.45 | 0.1 – 1.5 |
front_rebound_damping | Front rebound damping | damping ratio | 0.45 | 0.1 – 1.5 |
rear_bump_damping | Rear bump damping | damping ratio | 0.45 | 0.1 – 1.5 |
rear_rebound_damping | Rear rebound damping | damping ratio | 0.45 | 0.1 – 1.5 |
Write a damping ratio (a fraction of critical damping), not N·s/m. KurumaMod works out the coefficient from that wheel's spring and load, so changing stroke or mass keeps the feel the same. At 1 the car just stops bouncing back. Real cars often run rebound at 1.5–3 times bump, which soaks up bumps softly but settles quickly.
Steering geometry
| Name | On the tuning screen | Unit | Default | Range |
|---|---|---|---|---|
ackermann | Ackermann | fraction (1 = true Ackermann) | 0.5 | −0.5 – 1.2 |
front_toe | Front toe | rad (positive = toe-in) | 0 | −0.00873 – 0.00873 |
rear_toe | Rear toe | rad (positive = toe-in) | 0 | −0.00873 – 0.00873 |
front_roll_steer | Front roll steer | rad/rad (positive = understeer) | 0.05 | −0.2 – 0.3 |
rear_roll_steer | Rear roll steer | rad/rad (positive = understeer) | 0.08 | −0.2 – 0.3 |
front_compliance_steer | Front compliance steer | rad/G (positive = understeer) | 0.00873 (= 0.5°/G) | −0.00873 – 0.0262 |
rear_compliance_steer | Rear compliance steer | rad/G (positive = understeer) | 0.00349 (= 0.2°/G) | −0.00873 – 0.0262 |
Tires
| Name | On the tuning screen | Unit | Default | Range |
|---|---|---|---|---|
friction | Grip | μ | 1 | 0.3 – 1.5 |
tire_falloff | Grip loss when sliding | fraction | 0 | 0 – 0.5 |
tire_load_sensitivity | Tyre load sensitivity | — | 0.15 | 0 – 0.4 |
cornering_stiffness | Lateral slip stiffness | — | 12 | 4 – 25 |
longitudinal_stiffness | Longitudinal slip stiffness | — | 18 | 5 – 40 |
wheel_radius | Tyre radius | m | 0.45 | 0.25 – 1.1 |
friction is the actual coefficient of friction (μ). The tuning screen shows it relative to the default (the reference is 1.0 for now, so the numbers match).
Chassis
| Name | On the tuning screen | Unit | Default | Range |
|---|---|---|---|---|
mass | Mass | kg | 1200 | 500 – 2500 |
weight_distribution | Weight distribution | fraction on the front axle | 0.56 | 0.35 – 0.7 |
wheel_base | Wheelbase | m | 3.12 | 2 – 7 |
track_width | Track width | m | 2 | 1.2 – 4 |
Engine
| Name | On the tuning screen | Unit | Default | Range |
|---|---|---|---|---|
peak_torque | Peak torque | N·m | 350 | 60 – 700 |
peak_torque_rpm | Peak torque rpm | rpm | 4200 | 1500 – 8000 |
peak_power_rpm | Peak power rpm | rpm | 1.59 × peak torque rpm (6676.4) | 2500 – 12000 |
idle_rpm | Idle rpm | rpm | 800 | 500 – 2000 |
redline_rpm | Redline | rpm | 7000 | 4000 – 12000 |
engine_brake | Engine braking | N·m | 35 | 0 – 120 |
engine_inertia | Engine inertia | kg·m² | 0.25 | 0.05 – 1 |
Gearbox
| Name | On the tuning screen | Unit | Default | Range |
|---|---|---|---|---|
gear_count | Forward gears | gears | 5 | 3 – 8 |
first_gear | 1st gear ratio | — | 4.2 | 1.5 – 5 |
top_gear | Top gear ratio | — | 0.85 | 0.4 – 1.5 |
drivetrain_efficiency | Drivetrain efficiency | — | 0.9 | 0.7 – 1 |
shift_time | Shift time | s | 0.35 | 0 – 1.5 |
manual_transmission | Transmission | 0 = AT, 1 = MT | 0 | 0 – 1 |
Driveline & Differential
| Name | On the tuning screen | Unit | Default | Range |
|---|---|---|---|---|
drive_layout | Drive layout | 0 = FWD, 1 = RWD, 2 = AWD | 2 | 0 – 2 |
torque_split | Front/rear torque split | rear share (AWD only) | 0.5 | 0.1 – 0.9 |
diff_preload | Diff preload | N·m | 0 | 0 – 300 |
diff_lock_ratio | Diff lock ratio | — | 0 | 0 – 1 |
diff_coast_ratio | Diff coast ratio | — | 0.5 | 0 – 1 |
center_diff_lock | Centre diff lock | — | 0 | 0 – 1 |
With diff_lock_ratio and diff_preload both at 0 it is an open diff. diff_coast_ratio is 1-way at 0, 1.5-way at 0.5, 2-way at 1.
torque_split and center_diff_lock only apply to AWD (drive_layout 2). torque_split is the share of drive sent to each axle; the more goes to the rear, the more the tail steps out on the throttle (RWD-like). With center_diff_lock at 0 the centre is open and the split holds exactly; raising it pulls the front and rear speeds together and moves torque from an axle that starts to spin to the one that still grips (1 is fully locked). The tighter it is, the less the split matters, and the car resists tight turns at low speed (tight-corner braking). It opens automatically while the handbrake is pulled. The old drive_bias (0 = FWD, 1 = RWD, anything between = AWD split) is still read.
Brakes & Resistance
| Name | On the tuning screen | Unit | Default | Range |
|---|---|---|---|---|
abs | ABS | strength (0 = off) | 0.7 | 0 – 1 |
rolling_resistance | Rolling resistance | — | 0.15 | 0 – 1 |
There is no top-speed field. The real top speed comes out of torque versus resistance, and the car can never go faster than top gear at the redline.
Aerodynamics
| Name | On the tuning screen | Unit | Default | Range |
|---|---|---|---|---|
drag_area | Drag area (CdA) | m² (Cd × frontal area) | 0.78 | 0.2 – 5 |
front_downforce | Front downforce | m² (−Cl × area) | 0 | 0 – 3 |
rear_downforce | Rear downforce | m² (−Cl × area) | 0 | 0 – 3 |
Drag is applied as a force, so the same value slows a heavier car less. Rough guide: sports car 0.5, saloon 0.7, SUV 1.0. Packs that still write the old drag (a deceleration coefficient) are converted using that car's mass, so they drive exactly as before.
Downforce pushes the body down at the front and rear axles and grows with the square of speed. More at the front gives oversteer, more at the rear gives understeer. It costs drag too (one sixth of the downforce is added to CdA), so the more you add, the lower the top speed. Rough guide: 0.3–0.6 in total for a road car with a wing, 2–3 for a GT-class race car.
Controls & Aids
| Name | On the tuning screen | Unit | Default | Range |
|---|---|---|---|---|
max_steer | Max steering angle | rad | 0.6109 (= 35°) | 0.1745 – 1.1345 |
steer_grip_margin | Steering margin (higher = slides more) | — | 1 | 0.8 – 8 |
visual_slip_limit | Visual wheel angle | rad (0 = off) | 0.7854 (= 45°) | 0 – 1.5708 |
steer_rate | Steering lock-to-lock time | s | 0.18 | 0 – 1 |
steer_return | Steering return time | s | 0.11 | 0 – 1 |
self_aligning | Self-aligning torque | — (0 = returns to centre) | 0 | 0 – 1 |
pedal_press | Pedal press time | s | 0.25 | 0 – 1 |
pedal_release | Pedal release time | s | 0.12 | 0 – 1 |
handbrake_press | Handbrake press time | s | 0 | 0 – 1 |
traction_control | Traction control | strength (0 = off) | 1 | 0 – 1 |
付録 B. 書いても読まれない値
Appendix B. Values ignored even if you write them
他の諸元から決まる値は、書いても黙って捨てられます。KurumaMod が計算します。
Values that follow from other values are silently dropped. KurumaMod computes them.
| 決まるもの | 何から |
|---|---|
| バネ・バンプストップ・ダンパーの係数(減衰比は付録 A) | mass / weight_distribution / stroke |
| 重心高 | 停車時の車高 |
| 慣性モーメント 3 つ | mass と wheel_base / track_width |
| 車輪の慣性・登坂できる段差・終減速比 | wheel_radius |
| 制動配分 | weight_distribution と重心高とホイールベース |
| ブレーキとサイドブレーキの効き | friction |
| 変速点・バックの最高速 | redline_rpm とギア比 |
| Derived | From |
|---|---|
| Springs, bump stops, damper coefficients (the ratios are in Appendix A) | mass / weight_distribution / stroke |
| Centre of gravity height | Static ride height |
| All three moments of inertia | mass with wheel_base / track_width |
| Wheel inertia, climbable step, final drive | wheel_radius |
| Brake bias | weight_distribution, CG height and wheelbase |
| Brake and handbrake authority | friction |
| Shift points, reverse top speed | redline_rpm and the gear ratios |
そのため「タイヤ半径を変えたらファイナルも直す」「寸法を変えたら慣性も」といった組み合わせの手直しは要りません。半径を変えればギアリングも車高も登坂力も一緒に動きます。
So there is no cross-checking to do — no "I changed the tyre radius, now fix the final drive", no "I changed the dimensions, now fix the inertia". Change the radius and the gearing, ride height and climbing ability all move with it.
KurumaMod — 諸元の全項目は車の付録 A。ゲージスクリプトは modeling_tools/blender_gauge.py と modeling_tools/blender_wheel_gauge.py。
KurumaMod — every spec key is in Appendix A of the Car guide. The gauge scripts are modeling_tools/blender_gauge.py and modeling_tools/blender_wheel_gauge.py.